
To use Uniswap on your PC, first install and configure a compatible wallet like MetaMask. Then, visit the Uniswap website (app.uniswap.org), connect your MetaMask wallet, select the tokens you wish to swap or add to liquidity pools, and confirm the transactions through your wallet. Ensure you have enough ETH for gas fees.
Setting Up Your Wallet
Choosing a Compatible Wallet
Selecting the right wallet is crucial for securely managing your assets and interacting with Uniswap. Here are some compatible wallets that work seamlessly with Uniswap:
- MetaMask: A widely-used browser extension wallet that supports Ethereum and ERC-20 tokens. It integrates directly with Uniswap, making it a popular choice for DeFi users.
- Trust Wallet: A mobile wallet that supports a wide range of cryptocurrencies and tokens. It offers easy integration with Uniswap through its in-app browser.
- Coinbase Wallet: A user-friendly mobile wallet by Coinbase that supports Ethereum-based tokens and provides direct access to Uniswap.
- Ledger: A hardware wallet that provides enhanced security for your private keys. Ledger users can connect to Uniswap via MetaMask for secure transactions.
When choosing a wallet, consider factors like security, ease of use, and compatibility with other DeFi platforms you might use.
Installing and Configuring MetaMask
MetaMask is one of the most popular wallets for interacting with Uniswap. Follow these steps to install and configure MetaMask on your PC:
- Download MetaMask: Visit the official MetaMask website (metamask.io) and download the browser extension for Chrome, Firefox, Brave, or Edge.
- Navigate to the MetaMask website.
- Click the “Download” button and select your browser.
- Follow the prompts to install the extension.
- Create a New Wallet: After installing MetaMask, you’ll need to create a new wallet.
- Open the MetaMask extension and click “Get Started.”
- Select “Create a Wallet” and follow the instructions.
- Set a strong password to secure your wallet.
- Secure Your Seed Phrase: MetaMask will provide you with a 12-word seed phrase. This phrase is crucial for recovering your wallet if you lose access.
- Write down the seed phrase on paper and store it in a secure place.
- Do not share your seed phrase with anyone.
- Confirm the seed phrase in MetaMask to complete the setup.
- Fund Your Wallet: To use Uniswap, you need to have some Ethereum (ETH) in your wallet for gas fees.
- You can purchase ETH on an exchange like Coinbase or Binance and transfer it to your MetaMask wallet.
- Copy your MetaMask wallet address and use it to receive ETH.

Connecting Your Wallet to Uniswap
Navigating to the Uniswap Website
To begin using Uniswap, you need to access the official Uniswap website. Follow these steps to navigate to the correct site:
- Open Your Browser: Use a web browser that supports MetaMask, such as Chrome, Firefox, Brave, or Edge.
- Go to the Uniswap Website: In your browser’s address bar, type “uniswap.org” and press Enter. This will take you to the official Uniswap website.
- Access the App: On the Uniswap homepage, click the “Launch App” button. This will direct you to the Uniswap trading interface, usually located at “app.uniswap.org.”
Always ensure you are on the correct URL to avoid phishing sites. Bookmark the official Uniswap site for easy and safe access.
Linking MetaMask with Uniswap
Once you have navigated to the Uniswap app, the next step is to link your MetaMask wallet. Here’s how to do it:
- Open MetaMask Extension: Click on the MetaMask icon in your browser’s toolbar to open the wallet extension.
- Unlock Your Wallet: If your MetaMask wallet is locked, enter your password to unlock it.
- Connect to Uniswap: In the Uniswap interface, click the “Connect Wallet” button, typically located in the top right corner.
- A list of supported wallets will appear. Select “MetaMask” from the options.
- MetaMask will prompt you to connect. Click “Next” and then “Connect” to authorize Uniswap to interact with your wallet.
- Select Account: If you have multiple accounts in MetaMask, choose the account you want to connect with Uniswap and click “Next.”
- Confirm Connection: Click “Connect” again to finalize the connection between MetaMask and Uniswap.
Swapping Tokens on Uniswap
Selecting the Tokens to Swap
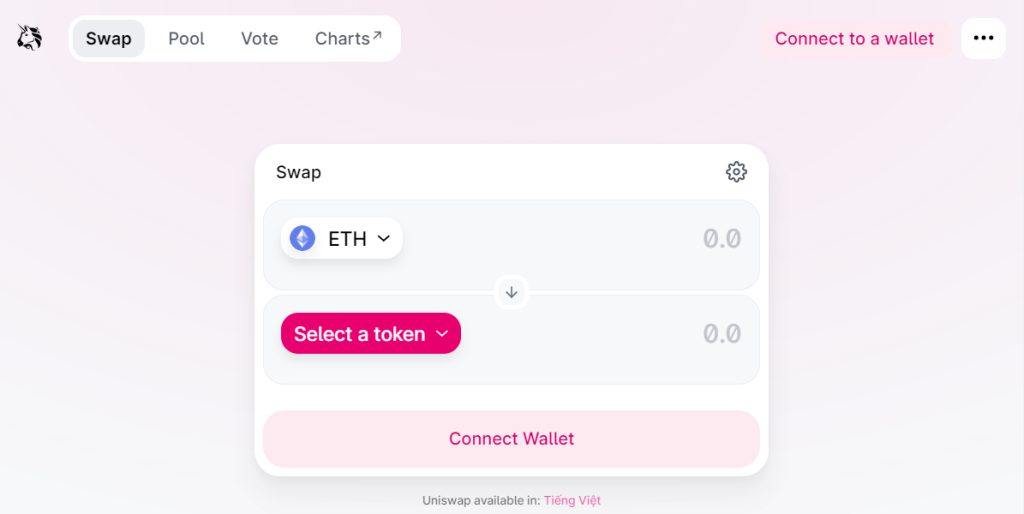
Swapping tokens on Uniswap is a straightforward process. Here’s how to select the tokens you want to swap:
- Open the Uniswap App: Ensure your wallet is connected and navigate to the Uniswap trading interface at “app.uniswap.org”.
- Choose the Swap Tab: Make sure you are on the “Swap” tab, which is the default tab when you open the app.
- Select the Input Token: Click on the dropdown menu labeled “From” to choose the token you want to swap. You can search for the token by name or by pasting its contract address. Select the token you hold in your MetaMask wallet.
- Select the Output Token: Click on the dropdown menu labeled “To” to choose the token you want to receive. Again, you can search for the token by name or paste its contract address. Select the token you want to receive in exchange.
Executing a Token Swap Transaction
Once you have selected the tokens to swap, you can proceed with executing the transaction. Follow these steps:
- Enter the Amount: In the “From” field, enter the amount of the input token you wish to swap. The system will automatically calculate and display the estimated amount of the output token you will receive.
- If you want to swap your entire balance of the input token, you can click on the “Max” button.
- Review the Swap Details: Ensure that the details of the swap are correct, including the tokens, amounts, and the estimated rate. Check the “Price Impact” and “Liquidity Provider Fee” displayed below the swap interface.
- Adjust Slippage Tolerance: Click on the settings icon (usually a gear icon) to adjust the slippage tolerance. Slippage tolerance is the percentage of price movement you are willing to accept for the swap. A common setting is 0.5% to 1%.
- Initiate the Swap: Click the “Swap” button to initiate the transaction. A confirmation window will appear with the transaction details.
- Confirm the Transaction in MetaMask: MetaMask will prompt you to confirm the transaction. Review the gas fees and total cost, then click “Confirm” to authorize the transaction.
- Wait for Confirmation: After confirming, the transaction will be submitted to the Ethereum network. You can view the transaction status in MetaMask under the “Activity” tab or by checking the transaction hash on Etherscan.
- Transaction Complete: Once the transaction is confirmed, the swapped tokens will appear in your MetaMask wallet. You can also see the updated balance in the Uniswap interface.
Providing Liquidity on Uniswap
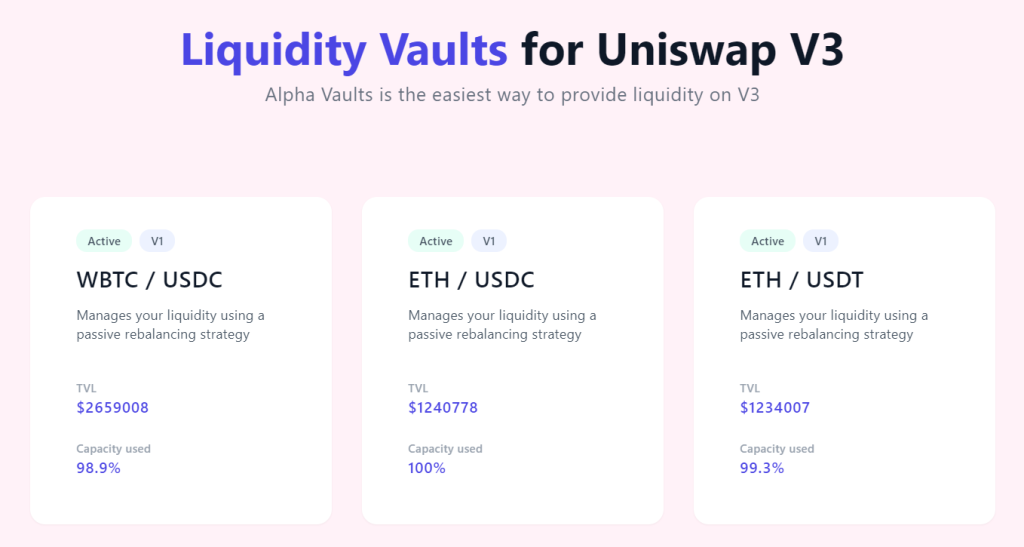
Understanding Liquidity Pools
Liquidity pools are a fundamental component of Uniswap, enabling decentralized trading by providing the liquidity necessary for token swaps.
- What is a Liquidity Pool?: A liquidity pool is a smart contract that holds reserves of two tokens, enabling users to trade between them. These reserves are supplied by liquidity providers (LPs) who earn fees from the trades that occur in the pool.
- How Liquidity Pools Work: When users trade on Uniswap, they trade against the liquidity in the pool. The price of the tokens is determined by the ratio of the two tokens in the pool, adjusted by the constant product formula (x * y = k).
- Earnings from Providing Liquidity: Liquidity providers earn a portion of the trading fees (typically 0.3%) proportional to their share of the total liquidity in the pool. These fees are added to the pool and can be claimed by the LPs when they withdraw their liquidity.
- Risks of Providing Liquidity: While LPs can earn fees, they are also exposed to impermanent loss, which occurs when the price of the tokens in the pool diverges from the price at which they were deposited. It’s important to understand this risk before providing liquidity.
Adding Liquidity to a Pool
To provide liquidity on Uniswap, follow these steps:
- Open the Uniswap App: Ensure your wallet is connected and navigate to the Uniswap app at “app.uniswap.org”.
- Select the Pool Tab: Click on the “Pool” tab to access the liquidity provision interface.
- Add Liquidity: Click on the “Add Liquidity” button. This will take you to the page where you can add liquidity to an existing pool or create a new pool.
- Choose the Token Pair: Select the token pair you want to provide liquidity for. You can choose from popular pairs listed or search for the tokens by name or contract address.
- Enter the Amounts: Enter the amount of each token you wish to deposit into the pool. Uniswap will automatically calculate the required amount of the other token based on the current pool ratio.
- Balanced Contribution: Ensure you have enough of both tokens to add liquidity. The amounts should be proportional to the pool’s current ratio.
- Review and Approve Tokens: Review the details of your liquidity addition, including the pool share you will receive and the potential earnings.
- Token Approval: If it’s your first time providing liquidity for these tokens, you’ll need to approve the Uniswap contract to spend your tokens. Click “Approve” for each token and confirm the approval transactions in MetaMask.
- Supply Liquidity: After approving the tokens, click the “Supply” button to add your tokens to the pool. A confirmation window will appear with the transaction details.
- Confirm in MetaMask: Confirm the liquidity provision transaction in MetaMask by reviewing the gas fees and clicking “Confirm”.
- Transaction Confirmation: Wait for the transaction to be confirmed on the Ethereum network. Once confirmed, you will receive pool tokens representing your share of the liquidity in the pool.
- Monitor and Manage Liquidity: You can view and manage your liquidity positions in the “Pool” tab. Here, you can see your pool share, earned fees, and withdraw your liquidity when desired.
Staking and Yield Farming
Participating in Staking Programs
Staking programs allow users to earn rewards by locking their tokens in a smart contract for a certain period. These programs are common in the DeFi ecosystem and offer various benefits.
- What is Staking?: Staking involves locking up your tokens in a protocol to support network operations like block validation and transaction processing. In return, stakers earn rewards, typically in the form of additional tokens.
- How to Stake Tokens:
- Choose a Staking Platform: Select a platform that offers staking programs. Popular platforms include Ethereum 2.0, Binance Smart Chain, and various DeFi protocols like Yearn Finance and Aave.
- Connect Your Wallet: Connect your wallet to the staking platform. Ensure your wallet holds the tokens you wish to stake.
- Select a Staking Pool: Choose a staking pool or program that suits your needs. Consider factors such as reward rates, lock-up periods, and platform reputation.
- Stake Your Tokens: Enter the amount of tokens you wish to stake and confirm the transaction in your wallet. The tokens will be locked in the staking contract, and you will start earning rewards.
- Benefits of Staking: Staking can provide a steady income stream through rewards. It also supports the security and functionality of the network. Some platforms offer additional incentives, such as governance rights or exclusive access to new features.
- Risks of Staking: Risks include lock-up periods during which you cannot access your tokens, potential slashing penalties for network misbehavior, and the overall volatility of the token being staked.
Maximizing Returns with Yield Farming
Yield farming, also known as liquidity mining, involves providing liquidity to DeFi protocols to earn rewards. It can be a lucrative but complex activity requiring strategic planning.
- What is Yield Farming?: Yield farming involves depositing tokens into DeFi protocols like Uniswap, Compound, or SushiSwap to earn interest, fees, or additional tokens. These protocols use your tokens to facilitate trading, lending, or borrowing activities.
- How to Participate in Yield Farming:
- Choose a Yield Farming Platform: Identify platforms offering yield farming opportunities. Look for platforms with high annual percentage yields (APYs) and good security records.
- Connect Your Wallet: Use a wallet like MetaMask to connect to the yield farming platform.
- Select Liquidity Pools: Choose liquidity pools based on the tokens you hold and the expected returns. Some pools may offer higher rewards but come with increased risk.
- Deposit Tokens: Add your tokens to the chosen liquidity pools. You will receive LP tokens representing your share of the pool.
- Earn Rewards: Monitor your deposited tokens and harvest rewards periodically. Some platforms allow automatic reinvestment of rewards to compound earnings.
- Strategies for Maximizing Returns:
- Diversification: Spread your investments across multiple pools and platforms to reduce risk and increase potential returns.
- Reinvestment: Reinvest your rewards to compound interest and maximize long-term gains.
- Stay Informed: Keep up with market trends, platform updates, and new farming opportunities. Join DeFi communities and follow relevant news to stay ahead.
- Use Tools and Analytics: Utilize DeFi analytics tools to track your investments, compare yields, and optimize your farming strategy.
- Risks of Yield Farming: Yield farming can be risky due to market volatility, smart contract vulnerabilities, and potential impermanent loss. It’s crucial to thoroughly research platforms and strategies before investing.

Security Best Practices
Protecting Your Private Keys
Your private keys are crucial for accessing and managing your cryptocurrency assets. Ensuring their security is paramount to prevent unauthorized access and potential loss of funds.
- Use Hardware Wallets: Hardware wallets like Ledger and Trezor store your private keys offline, significantly reducing the risk of hacking and malware attacks. They are considered one of the most secure methods for managing private keys.
- Secure Storage: Store your private keys and seed phrases in a secure location. Avoid storing them digitally on your computer or cloud services. Instead, write them down and keep them in a safe place.
- Enable Two-Factor Authentication (2FA): Use 2FA for all your cryptocurrency accounts and wallets. This adds an extra layer of security, making it harder for attackers to gain access even if they obtain your password.
- Regular Backups: Regularly back up your wallet and private keys. Ensure that backups are kept in multiple secure locations to protect against physical damage or loss.
- Phishing Awareness: Be cautious of phishing attempts. Always verify the authenticity of websites, emails, and messages. Avoid clicking on suspicious links and never share your private keys or seed phrases.
Avoiding Common Scams
Scams are prevalent in the cryptocurrency space, and being aware of common tactics can help you avoid falling victim to them.
- Phishing Scams: Scammers often create fake websites or emails that mimic legitimate services. Always double-check URLs and email addresses. Use bookmarks for important sites to avoid mistyping.
- Fake Investment Schemes: Be wary of investment opportunities that promise guaranteed returns or high profits with little to no risk. Research thoroughly and only invest through reputable platforms.
- Impersonation Scams: Scammers may impersonate well-known figures or customer support representatives. Verify identities through official channels and avoid direct communication through unverified means.
- Ponzi Schemes and Pump-and-Dump Groups: Avoid schemes that rely on recruiting new investors to pay returns to earlier investors or that artificially inflate the price of a token. These are unsustainable and often result in significant losses.
- Malicious Software and Links: Do not download software or click on links from untrusted sources. Malicious software can compromise your private keys and other sensitive information.
- Social Engineering: Scammers may use social engineering tactics to trick you into revealing personal information or private keys. Always be skeptical of unsolicited requests for information and verify through multiple channels.
Troubleshooting Common Issues
Resolving Connection Problems
Connection issues can arise when using Uniswap or other DeFi platforms, often due to wallet integration problems or network issues. Here are steps to troubleshoot and resolve these problems:
- Check Internet Connection: Ensure that your internet connection is stable and functioning correctly. A weak or intermittent connection can cause disruptions when interacting with DeFi platforms.
- Browser Compatibility: Ensure you are using a supported browser like Chrome, Firefox, Brave, or Edge. Sometimes, browser extensions or outdated browsers can cause issues.
- MetaMask Connection:
- Reconnect Wallet: If MetaMask is not connecting to Uniswap, try reconnecting your wallet. Click the “Disconnect” button and then “Connect Wallet” again in the Uniswap interface.
- Update MetaMask: Ensure your MetaMask extension is up to date. Updates often include bug fixes and compatibility improvements.
- Clear Browser Cache: Clearing your browser’s cache and cookies can resolve many connectivity issues. After clearing, restart your browser and try connecting again.
- Network Settings: Verify that MetaMask is set to the correct Ethereum network (mainnet or a specific testnet). Incorrect network settings can prevent proper connection.
- Disable Conflicting Extensions: Other browser extensions might interfere with MetaMask. Temporarily disable other extensions to see if the connection issue is resolved.
Handling Transaction Failures
Transaction failures can be frustrating, but they are relatively common in the DeFi space due to network congestion, insufficient gas fees, or contract issues. Here’s how to handle and resolve transaction failures:
- Insufficient Gas Fees:
- Increase Gas Fee: If a transaction fails due to insufficient gas fees, try resubmitting the transaction with a higher gas fee. MetaMask allows you to adjust the gas price and gas limit.
- Check Gas Prices: Use a gas tracker like ETH Gas Station to check current gas prices. Aim to use a gas price that is likely to be accepted by the network promptly.
- Network Congestion: During times of high network congestion, transactions may fail or take longer to confirm.
- Wait and Retry: Sometimes, waiting a few minutes and retrying the transaction can help. Network congestion often fluctuates, and retrying later might result in success.
- Use Faster Gas Settings: When retrying, select the “Fast” or “Instant” gas settings in MetaMask to prioritize your transaction.
- Contract Errors: Transactions may fail if there are issues with the smart contract or if the transaction parameters are incorrect.
- Review Error Messages: MetaMask and Etherscan provide error messages that can help diagnose the problem. Look for specific errors like “out of gas” or “revert.”
- Verify Contract Interaction: Ensure that you are interacting with the correct contract address and that all transaction parameters are accurate.
- Insufficient Funds: Ensure you have enough ETH in your wallet to cover both the transaction amount and the gas fees. Insufficient funds will cause the transaction to fail.
- Pending Transactions: Multiple pending transactions can cause issues, as Ethereum processes transactions sequentially.
- Speed Up or Cancel Pending Transactions: Use MetaMask’s “Speed Up” or “Cancel” options to manage pending transactions. Increasing the gas fee can help prioritize and complete them faster.