
To connect to Uniswap V3, first, ensure you have a web3-compatible wallet like MetaMask, Trust Wallet, or Coinbase Wallet. Visit app.uniswap.org and click “Connect Wallet.” Select your wallet from the list, follow the prompts to authorize the connection, and confirm in your wallet. Once connected, you can start trading tokens and providing liquidity on the platform.
Choosing a Compatible Wallet
Supported Wallets
To connect to Uniswap V3, you need a web3-compatible wallet that supports Ethereum-based applications. Here are some of the most popular and reliable wallets you can use:
MetaMask
- Overview: MetaMask is a widely-used browser extension and mobile app that allows users to manage Ethereum-based assets and interact with decentralized applications (DApps).
- Compatibility: Available for Chrome, Firefox, Brave, and Edge browsers, as well as iOS and Android devices.
Trust Wallet
- Overview: Trust Wallet is a mobile wallet app officially supported by Binance. It supports a wide range of cryptocurrencies and includes a built-in DApp browser.
- Compatibility: Available for iOS and Android devices.
Coinbase Wallet
- Overview: Coinbase Wallet is a mobile app developed by Coinbase, providing a secure way to store and manage cryptocurrencies and interact with DApps.
- Compatibility: Available for iOS and Android devices.
WalletConnect
- Overview: WalletConnect is an open protocol that allows users to connect their mobile wallets to DApps on other devices by scanning a QR code.
- Compatibility: Works with multiple wallet apps, including MetaMask, Trust Wallet, and others.
Setting Up Your Wallet
MetaMask
- Download and Install: Visit the MetaMask website or your device’s app store to download the extension or app. Install it following the provided instructions.
- Create a Wallet: Open MetaMask and click “Get Started.” Choose “Create a Wallet,” set a strong password, and back up your seed phrase in a secure location.
- Connect to Uniswap: Once your wallet is set up, navigate to app.uniswap.org and click “Connect Wallet.” Select MetaMask and follow the prompts to authorize the connection.
Trust Wallet
- Download and Install: Visit the Trust Wallet website or your device’s app store to download and install the app.
- Create a Wallet: Open Trust Wallet, click “Create a New Wallet,” and follow the instructions to secure your seed phrase and set up your wallet.
- Use the DApp Browser: Open the built-in DApp browser within Trust Wallet, navigate to app.uniswap.org, and connect your wallet.
Coinbase Wallet
- Download and Install: Visit the Coinbase Wallet website or your device’s app store to download and install the app.
- Create a Wallet: Open Coinbase Wallet, click “Create a New Wallet,” choose a username, secure your seed phrase, and complete the setup.
- Access Uniswap: Use the built-in DApp browser to navigate to app.uniswap.org and connect your wallet.
WalletConnect
- Select a Compatible Wallet: Choose a wallet that supports WalletConnect, such as MetaMask or Trust Wallet.
- Open the DApp: On your desktop, open the Uniswap interface at app.uniswap.org and click “Connect Wallet.”
- Scan the QR Code: Select WalletConnect, and a QR code will appear. Open your mobile wallet app, select “WalletConnect,” and scan the QR code to connect.

Navigating to the Uniswap V3 Interface
Official Website
Accessing Uniswap V3 via the official website is straightforward and ensures you are using a legitimate and secure platform. Here’s how to navigate to the Uniswap V3 interface using a web browser:
Steps to Access the Official Website
- Open Your Web Browser: Use a web browser like Chrome, Firefox, Brave, or Edge.
- Enter the URL: Type app.uniswap.org in the address bar and press Enter. This URL directs you to the official Uniswap V3 interface.
- Verify the Website: Ensure that the URL starts with “https://” and has the correct domain name to avoid phishing sites.
Connecting Your Wallet
- Click “Connect Wallet”: Once on the Uniswap V3 interface, look for the “Connect Wallet” button, typically located in the upper right corner of the page.
- Select Your Wallet: Choose your preferred wallet from the list of supported options (e.g., MetaMask, Trust Wallet, Coinbase Wallet).
- Authorize the Connection: Follow the prompts to authorize the connection in your wallet. Ensure you approve the connection to the correct website.
Using Mobile Wallets
Mobile wallets offer the convenience of accessing Uniswap V3 directly from your smartphone. These wallets often include built-in browsers that support decentralized applications (DApps). Here’s how to navigate to Uniswap V3 using popular mobile wallets:
MetaMask Mobile
- Download MetaMask: Install the MetaMask app from the App Store (iOS) or Google Play Store (Android).
- Open MetaMask: Launch the MetaMask app and complete the wallet setup or import an existing wallet.
- Access the Built-In Browser: Tap the menu icon (usually three horizontal lines) in the top left corner and select “Browser.”
- Navigate to Uniswap V3: In the browser’s address bar, enter app.uniswap.org and press Enter.
- Connect Your Wallet: Tap “Connect Wallet” on the Uniswap interface and follow the prompts to authorize the connection.
Trust Wallet
- Download Trust Wallet: Install the Trust Wallet app from the App Store (iOS) or Google Play Store (Android).
- Open Trust Wallet: Launch the Trust Wallet app and complete the wallet setup or import an existing wallet.
- Access the DApp Browser: Tap the “Browser” icon at the bottom of the screen.
- Navigate to Uniswap V3: In the browser’s address bar, enter app.uniswap.org and press Enter.
- Connect Your Wallet: Tap “Connect Wallet” on the Uniswap interface and follow the prompts to authorize the connection.
Coinbase Wallet
- Download Coinbase Wallet: Install the Coinbase Wallet app from the App Store (iOS) or Google Play Store (Android).
- Open Coinbase Wallet: Launch the Coinbase Wallet app and complete the wallet setup or import an existing wallet.
- Access the DApp Browser: Tap the “Browser” icon at the bottom of the screen.
- Navigate to Uniswap V3: In the browser’s address bar, enter app.uniswap.org and press Enter.
- Connect Your Wallet: Tap “Connect Wallet” on the Uniswap interface and follow the prompts to authorize the connection.
Connecting Your Wallet to Uniswap V3
Steps to Connect MetaMask
Download and Install MetaMask
- Visit Official Sources: Download MetaMask from the official website or install the app from the App Store (iOS) or Google Play Store (Android).
- Browser Extension: For desktop users, install the MetaMask extension on your preferred browser (Chrome, Firefox, Brave, or Edge).
Set Up MetaMask
- Create a New Wallet: Open MetaMask and click “Get Started.” Choose “Create a Wallet,” set a strong password, and securely back up your seed phrase.
- Import an Existing Wallet: If you have an existing wallet, select “Import Wallet” and enter your seed phrase to restore your wallet.
Connect to Uniswap V3
- Visit Uniswap V3: Open your web browser and navigate to app.uniswap.org.
- Click “Connect Wallet”: On the Uniswap V3 interface, click the “Connect Wallet” button in the upper right corner.
- Select MetaMask: Choose MetaMask from the list of supported wallets. MetaMask will prompt you to authorize the connection.
- Authorize Connection: Review the connection details and click “Next,” then “Connect” to finalize the process.
Confirmation
- Wallet Connected: Once connected, your wallet address will appear on the Uniswap interface.
- Ready for Use: You can now trade tokens, provide liquidity, and interact with Uniswap V3.
Steps to Connect Trust Wallet
Download and Install Trust Wallet
- Visit Official Sources: Download Trust Wallet from the official website or install the app from the App Store (iOS) or Google Play Store (Android).
Set Up Trust Wallet
- Create a New Wallet: Open Trust Wallet, tap “Create a New Wallet,” and follow the instructions to secure your seed phrase.
- Import an Existing Wallet: If you have an existing wallet, select “Import Wallet” and enter your seed phrase to restore your wallet.
Connect to Uniswap V3
- Open the DApp Browser: Tap the “Browser” icon at the bottom of the Trust Wallet interface.
- Navigate to Uniswap V3: In the browser’s address bar, enter app.uniswap.org and press Enter.
- Click “Connect Wallet”: On the Uniswap V3 interface, click the “Connect Wallet” button.
- Select Trust Wallet: Choose Trust Wallet from the list of supported wallets.
- Authorize Connection: Trust Wallet will prompt you to authorize the connection. Confirm the connection to proceed.
Confirmation
- Wallet Connected: Once connected, your wallet address will appear on the Uniswap interface.
- Ready for Use: You can now trade tokens, provide liquidity, and interact with Uniswap V3.
Steps to Connect Coinbase Wallet
Download and Install Coinbase Wallet
- Visit Official Sources: Download Coinbase Wallet from the official website or install the app from the App Store (iOS) or Google Play Store (Android).
Set Up Coinbase Wallet
- Create a New Wallet: Open Coinbase Wallet, tap “Create a New Wallet,” choose a username, and secure your seed phrase.
- Import an Existing Wallet: If you have an existing wallet, select “Import Wallet” and enter your seed phrase to restore your wallet.
Connect to Uniswap V3
- Open the DApp Browser: Tap the “Browser” icon at the bottom of the Coinbase Wallet interface.
- Navigate to Uniswap V3: In the browser’s address bar, enter app.uniswap.org and press Enter.
- Click “Connect Wallet”: On the Uniswap V3 interface, click the “Connect Wallet” button.
- Select Coinbase Wallet: Choose Coinbase Wallet from the list of supported wallets.
- Authorize Connection: Coinbase Wallet will prompt you to authorize the connection. Confirm the connection to proceed.
Confirmation
- Wallet Connected: Once connected, your wallet address will appear on the Uniswap interface.
- Ready for Use: You can now trade tokens, provide liquidity, and interact with Uniswap V3.
Managing Your Uniswap V3 Account
Viewing Your Wallet Balance
To effectively manage your Uniswap V3 account, it is essential to know how to view your wallet balance. This allows you to keep track of your assets and ensure you have sufficient funds for trading and providing liquidity.
Steps to View Your Wallet Balance
- Connect Your Wallet: Ensure your wallet is connected to the Uniswap V3 interface by following the steps outlined for MetaMask, Trust Wallet, or Coinbase Wallet.
- Dashboard Overview: Once connected, your wallet address will appear on the Uniswap interface. Click on your wallet address or the profile icon to access the dashboard.
- Balance Display: Your wallet balance, including the various tokens you hold, will be displayed. This includes both Ethereum and ERC-20 tokens.
- Detailed Breakdown: For a more detailed breakdown, open your wallet app (MetaMask, Trust Wallet, Coinbase Wallet) where you can view each token’s balance, recent transactions, and value in your preferred fiat currency.
Additional Tips
- Real-Time Updates: The wallet balance on Uniswap updates in real-time as transactions are made.
- Using Mobile Wallets: If using a mobile wallet, you can view your balance directly within the app, often with added features like token price tracking and portfolio value.
Checking Transaction History
Keeping track of your transaction history is crucial for managing your Uniswap V3 account. It helps you monitor your trading activities, liquidity provision, and any fees incurred.
Steps to Check Transaction History
- Access Transaction History: In the Uniswap interface, navigate to the “Activity” or “History” tab. This section will display your recent transactions, including swaps, liquidity additions, and removals.
- Wallet-Specific History:
- MetaMask: Open MetaMask and click on the “Activity” tab. This will show all recent transactions, including those conducted through Uniswap.
- Trust Wallet: Open Trust Wallet, select the token, and view the “Transaction History” for detailed records.
- Coinbase Wallet: Open Coinbase Wallet, select the token, and navigate to the “Activity” tab to see your transaction history.
- Transaction Details: Click on individual transactions to see detailed information, such as the amount, transaction fees, and status (pending, completed, failed).
Additional Tips
- Etherscan Integration: For detailed transaction analysis, you can use Etherscan. Copy your wallet address and paste it into the Etherscan search bar to view all transactions associated with your address.
- CSV Export: Some wallets allow you to export your transaction history as a CSV file, useful for record-keeping and tax reporting.

Trading Tokens on Uniswap V3
Selecting Tokens to Trade
Choosing the right tokens to trade is the first step in executing a successful transaction on Uniswap V3. Here’s how to select tokens for trading:
Steps to Select Tokens
- Connect Your Wallet: Ensure your wallet (MetaMask, Trust Wallet, or Coinbase Wallet) is connected to the Uniswap V3 interface by navigating to app.uniswap.org and selecting “Connect Wallet.”
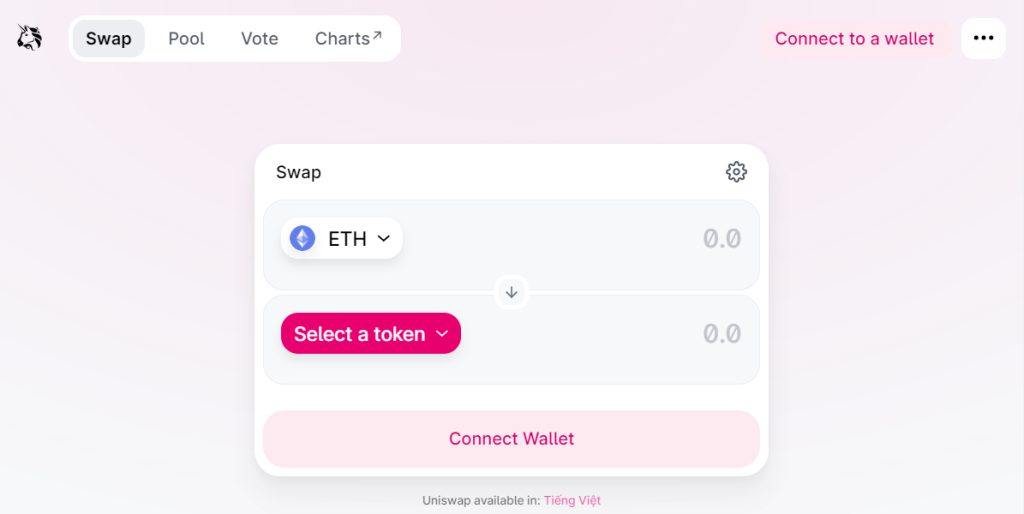
- Access the Swap Interface: Once connected, you’ll be directed to the main trading interface. Click on the “Swap” tab if you’re not already there.
- Choose the Tokens:
- Select Input Token: Click on the dropdown menu labeled “From” and choose the token you want to trade (e.g., ETH, USDC). You can either scroll through the list or type the token’s name or symbol in the search bar.
- Select Output Token: Click on the dropdown menu labeled “To” and choose the token you wish to receive. Similar to selecting the input token, you can scroll or search for the desired token.
Additional Tips
- Token Information: Ensure the token you are trading is verified by checking its contract address, which can be found on platforms like Etherscan or CoinGecko.
- Favorites: Frequently traded tokens can be saved to your favorites for quick access.
Executing a Trade
After selecting the tokens, the next step is to execute the trade. Here’s how to perform the swap on Uniswap V3:
Steps to Execute a Trade
- Enter Trade Amount: In the “From” field, enter the amount of the input token you wish to trade. The Uniswap interface will automatically calculate the corresponding amount of the output token.
- Review Transaction Details:
- Price Impact: Check the price impact of your trade, which indicates how much the trade will affect the token’s price.
- Minimum Received: This is the minimum amount of the output token you will receive after accounting for slippage.
- Slippage Tolerance: Adjust the slippage tolerance settings if needed. Slippage tolerance is the maximum acceptable difference between the expected price and the execution price due to price movement during the transaction.
- Transaction Fees: Review the estimated gas fees required for the transaction.
Confirm and Execute
- Initiate the Swap: Click the “Swap” button to initiate the trade.
- Confirm Swap: A confirmation window will appear, summarizing the details of your trade. Review the details carefully.
- Approve Transaction: Click “Confirm Swap” in the Uniswap interface. Your connected wallet (MetaMask, Trust Wallet, or Coinbase Wallet) will prompt you to approve the transaction.
- Authorize in Wallet: Review the transaction details in your wallet and confirm the transaction. You may need to adjust the gas fee settings for faster processing.
- Transaction Confirmation: Once confirmed, the transaction will be processed on the Ethereum blockchain. You can track its progress through your wallet or by using Etherscan.
Additional Tips
- Speed and Fees: During times of high network congestion, consider adjusting the gas fees to ensure timely transaction processing.
- Transaction Monitoring: Keep an eye on your transaction status within your wallet or on Etherscan to ensure it completes successfully.
Providing Liquidity on Uniswap V3
Adding Liquidity to a Pool
Providing liquidity on Uniswap V3 allows you to earn fees from trades that occur within the pool. Here’s how to add liquidity to a pool:
Steps to Add Liquidity
- Connect Your Wallet: Ensure your wallet (MetaMask, Trust Wallet, or Coinbase Wallet) is connected to the Uniswap V3 interface by navigating to app.uniswap.org and selecting “Connect Wallet.”
- Navigate to the Pool Section: Click on the “Pool” tab to access the liquidity management interface.
- Select “New Position”: Click on “New Position” to start adding liquidity to a pool.
- Choose Token Pair: Select the token pair you wish to provide liquidity for by clicking on the dropdown menus and searching for the tokens.
- Set Price Range:
- Define the Range: Use the sliders to set the minimum and maximum prices within which you want your liquidity to be active. This range should be chosen based on where you expect the most trading activity.
- Full Range: Alternatively, you can select a full range, but this will dilute your capital efficiency.
- Enter Token Amounts: Input the amounts of each token you want to deposit. The interface will show you the required amounts based on your selected price range.
- Review Details: Check the details, including the proportion of the pool you will own, the expected fees, and the deposit amounts.
- Add Liquidity: Click “Preview” to review your position, and then “Add” to confirm. Your wallet will prompt you to approve the transaction.
- Authorize in Wallet: Confirm the transaction in your wallet by approving the token allowances and the final deposit transaction.
Additional Tips
- Fee Tiers: Choose the appropriate fee tier (0.05%, 0.30%, or 1%) based on the volatility and trading volume of the token pair.
- Gas Fees: Be aware of the gas fees required for the transaction and adjust as necessary to ensure timely processing.
Managing Your Liquidity Positions
Once you have added liquidity, you need to manage your positions to maximize your returns and adjust based on market conditions.
Steps to Manage Liquidity Positions
- Access Your Positions: Navigate to the “Pool” tab to view your current liquidity positions. Your positions will be listed with details about the token pair, price range, and your share of the pool.
- Monitor Performance:
- Earnings: Track the fees earned from your liquidity provision. This information is available in the “Pool” section or within your wallet’s activity log.
- Price Range Activity: Ensure that your liquidity remains within the active price range by monitoring market conditions and price movements.
- Adjust Price Range: If market conditions change significantly, you may need to adjust your price range to maintain optimal liquidity provision.
- Remove Liquidity: To adjust your price range, first remove liquidity from the current position by selecting the position and clicking “Remove.”
- Re-add Liquidity: After removing liquidity, you can re-add it by following the steps to add liquidity, setting a new price range that reflects current market conditions.
- Collect Fees: Periodically collect the fees earned from your liquidity provision. This can be done by removing liquidity or through specific fee-claiming mechanisms provided in the interface.
Additional Tips
- Regular Monitoring: Regularly monitor your positions and market conditions to ensure your liquidity remains effective and profitable.
- Active Management: Be prepared to actively manage and adjust your positions to respond to market changes and maximize returns.
- Utilize Analytics: Use the analytics tools available in Uniswap V3 to gain insights into market trends and the performance of your liquidity positions.
Security Tips for Using Uniswap V3
Verifying URLs and Websites
Ensuring that you are interacting with the official Uniswap V3 platform is crucial for protecting your assets. Here are some tips to help you verify URLs and websites:
Official Website Verification
- Official URL: Always access Uniswap V3 through the official URL: app.uniswap.org. Bookmark this URL to avoid typing errors and phishing sites.
- Check for HTTPS: Ensure the URL starts with “https://” which indicates a secure connection. The padlock symbol in the address bar confirms the site’s security certificate.
- Look for the Correct Domain: Be wary of similar-looking domains or subdomains. The official domain is uniswap.org.
- Avoid Links from Unknown Sources: Do not click on links to Uniswap from unsolicited emails, messages, or social media posts. Always manually type the URL or use a trusted bookmark.
Using Browser Extensions
- Security Extensions: Consider using browser security extensions like MetaMask’s phishing detector, which warns you about suspicious websites.
- Check for Updates: Regularly update your browser and any security extensions to protect against the latest threats.
Community Resources
- Verify with Community: When in doubt, verify the URL with the Uniswap community through official channels like their Discord server, Reddit, or Twitter.
Protecting Your Private Keys
Your private keys are the most sensitive part of your crypto security. Here are steps to protect them:
Secure Storage
- Offline Storage: Store your private keys and seed phrases offline. Write them down and keep them in a secure place, such as a safe. Avoid storing them digitally where they could be hacked.
- Hardware Wallets: Consider using hardware wallets (e.g., Ledger, Trezor) for storing large amounts of cryptocurrency. These devices keep your keys offline and provide additional layers of security.
Avoid Sharing Private Keys
- Never Share: Do not share your private keys or seed phrases with anyone. No legitimate service or platform will ever ask for this information.
- Beware of Scams: Be cautious of scams asking you to provide your private keys or seed phrases to “verify” your wallet or account.
Using Secure Wallets
- Reputable Wallets: Use well-known and reputable wallets like MetaMask, Trust Wallet, and Coinbase Wallet. These wallets have robust security features and are regularly updated.
- Enable Security Features: Use additional security features provided by these wallets, such as two-factor authentication (2FA) and biometric security (fingerprint or facial recognition).
Regular Backups
- Backup Your Wallet: Regularly back up your wallet, especially after significant changes like adding new keys or accounts. Ensure backups are stored securely.
- Test Recovery: Periodically test your backup by restoring it on a new device to ensure you can recover your wallet if needed.
Awareness of Phishing Attacks
- Email and Message Security: Be cautious of phishing attempts via email, SMS, or messaging apps. Scammers often impersonate legitimate services to steal your information.
- Verify Requests: Always verify requests for information by contacting the service directly through official channels. Do not respond to unsolicited requests for private keys or personal information.