
To set up the Uniswap app, first download a compatible wallet like MetaMask or Trust Wallet from the Google Play Store or Apple App Store. Create a new wallet or import an existing one, then open the wallet’s built-in browser and navigate to uniswap.org. Connect your wallet by following the prompts, and you’re ready to start trading.
Choosing a Compatible Wallet
MetaMask
MetaMask is one of the most popular Ethereum wallets that integrates seamlessly with Uniswap, making it an excellent choice for users looking to interact with decentralized applications.
- Overview:
- Popularity: MetaMask is widely used by the DeFi community for its ease of use, robust security features, and seamless integration with various dApps, including Uniswap.
- Compatibility: Available as a browser extension for Chrome, Firefox, and Brave, and as a mobile app for both Android and iOS devices.
- Features:
- Secure Private Key Management: MetaMask securely stores private keys on your device, ensuring that only you have access to your funds.
- Built-In Browser: The mobile app includes a built-in browser for easy access to dApps.
- User-Friendly Interface: An intuitive interface that simplifies the process of managing assets, swapping tokens, and interacting with dApps.
- Network Customization: Support for multiple Ethereum-based networks and testnets, allowing for versatile usage across various platforms.
Trust Wallet
Trust Wallet is another highly recommended wallet for using Uniswap, known for its simplicity and multi-currency support.
- Overview:
- Multi-Currency Support: Trust Wallet supports a wide range of cryptocurrencies, including all ERC-20 tokens, making it a versatile option for DeFi enthusiasts.
- Ease of Use: Designed with beginners in mind, Trust Wallet offers a straightforward setup process and user-friendly interface.
- Features:
- Secure Storage: Private keys are stored locally on your device, enhancing security and control over your funds.
- Integrated dApp Browser: Trust Wallet includes a built-in dApp browser, providing easy access to Uniswap and other decentralized applications directly from the app.
- Staking and Earning: In addition to managing assets, Trust Wallet allows users to stake certain cryptocurrencies and earn rewards.
- Wide Compatibility: Available for both Android and iOS devices, ensuring broad accessibility.
Downloading and Installing the Wallet
MetaMask Installation Guide
MetaMask is a versatile wallet available as a browser extension and a mobile app. Here’s how to download and install MetaMask:
- Browser Extension:
- Open Chrome Web Store: Open Google Chrome and go to the Chrome Web Store by entering chrome.google.com/webstore.
- Search for MetaMask: In the search bar, type “MetaMask” and press enter.
- Select MetaMask: Find MetaMask in the search results and click on it to open its details page.
- Verify Developer: Ensure that the extension is offered by “MetaMask / ConsenSys” to avoid installing counterfeit extensions.
- Click Add to Chrome: Click the “Add to Chrome” button to start the installation process.
- Confirm Installation: A pop-up will appear asking for confirmation. Click “Add Extension” to complete the installation.
- Open MetaMask: After installation, the MetaMask icon will appear in your browser’s toolbar. Click on the icon to open MetaMask and follow the prompts to set up your wallet.
- Mobile App:
- Open App Store: Open the Google Play Store on Android or the Apple App Store on iOS.
- Search for MetaMask: In the search bar, type “MetaMask” and press enter.
- Select MetaMask: Find the MetaMask app and tap on it to open its details page.
- Verify Developer: Ensure the app is developed by “MetaMask / ConsenSys.”
- Tap Install: Click the “Install” button to download and install MetaMask on your device.
- Open MetaMask: After installation, tap the MetaMask icon on your home screen to launch the app and follow the prompts to set up your wallet.
Trust Wallet Installation Guide
Trust Wallet is a mobile-only wallet known for its ease of use and robust features. Here’s how to download and install Trust Wallet:
- Open App Store:
- Open Google Play Store: Open the Google Play Store on your Android device.
- Open Apple App Store: Open the Apple App Store on your iOS device.
- Search for Trust Wallet:
- In the Search Bar: Type “Trust Wallet” and press enter.
- Select Trust Wallet: Find the Trust Wallet app and tap on it to open its details page.
- Verify Developer:
- Developer Verification: Ensure the app is developed by “Trust Wallet, Inc.” This helps avoid installing counterfeit apps.
- Download and Install:
- Tap Install: Click the “Install” button to download and install Trust Wallet on your device.
- Wait for Installation: The installation process will complete in a few moments, depending on your internet connection speed.
- Open Trust Wallet:
- Launch the App: After installation, tap the Trust Wallet icon on your home screen to open the app.
- Set Up Wallet: Follow the on-screen instructions to create a new wallet or import an existing one using your recovery phrase.
Creating a New Wallet
Setting Up MetaMask Wallet
MetaMask is a popular Ethereum wallet that allows users to interact with decentralized applications (dApps) like Uniswap. Here’s how to set up a new MetaMask wallet:
- Launch MetaMask:
- Browser Extension: Click on the MetaMask icon in your browser’s toolbar to open the extension.
- Mobile App: Tap the MetaMask icon on your home screen to launch the app.
- Create a New Wallet:
- Get Started: On the welcome screen, click or tap “Get Started.”
- Create a Wallet: Select the option to create a new wallet.
- Agree to Terms: Read and agree to the terms of service and privacy policy.
- Set Up Password:
- Create Password: Enter a strong password for your wallet. This password will be used to access your wallet in the browser or app.
- Confirm Password: Re-enter the password to confirm it.
- Secure Your Wallet: Click or tap “Create” to proceed.
- Backup Your Seed Phrase:
- View Seed Phrase: MetaMask will generate a 12-word seed phrase. Write down this phrase on paper and store it in a secure location. Do not save it digitally to prevent hacking.
- Confirm Seed Phrase: Verify your seed phrase by selecting the words in the correct order. This step ensures you have accurately recorded your seed phrase.
- Complete Setup: After confirming your seed phrase, click or tap “All Done” to complete the setup process.
- Start Using MetaMask:
- Explore Features: You can now access your MetaMask wallet. Explore the interface to view your account balance, transaction history, and access the built-in dApp browser for interacting with Uniswap.
Setting Up Trust Wallet
Trust Wallet is a secure mobile wallet that supports multiple cryptocurrencies, including all ERC-20 tokens. Here’s how to set up a new Trust Wallet:
- Launch Trust Wallet:
- Open the App: Tap the Trust Wallet icon on your home screen to open the app.
- Create a New Wallet:
- Get Started: On the welcome screen, tap “Create a new wallet.”
- Agree to Terms: Read and agree to the terms of service and privacy policy.
- Set Up Recovery Phrase:
- Backup Your Seed Phrase: Trust Wallet will generate a 12-word recovery phrase. Write down this phrase on paper and store it in a secure location. Avoid saving it digitally to prevent hacking.
- Confirm Seed Phrase: Verify your recovery phrase by selecting the words in the correct order. This step ensures you have accurately recorded your recovery phrase.
- Complete Setup: After confirming your seed phrase, tap “Done” to complete the setup process.
- Set Up Security:
- Enable Security Features: Set up a PIN code or enable biometric authentication (fingerprint or facial recognition) to enhance the security of your wallet.
- Start Using Trust Wallet:
- Explore Features: You can now access your Trust Wallet. Explore the interface to view your account balance, transaction history, and access the built-in dApp browser for interacting with Uniswap.
Securing Your Wallet
Backing Up Your Seed Phrase
A seed phrase (also known as a recovery phrase) is a series of words generated by your wallet that allows you to recover your wallet if you lose access to your device. Properly backing up your seed phrase is crucial for the security of your wallet.
- Write It Down:
- Physical Backup: Write down your seed phrase on paper and store it in a secure location. Do not save it digitally, such as on your computer or phone, to prevent hacking.
- Multiple Copies: Consider making multiple copies of your seed phrase and storing them in different secure locations. This adds an extra layer of protection in case one copy is lost or damaged.
- Store Securely:
- Safe Storage: Keep your written seed phrase in a safe place, such as a fireproof safe or a secure deposit box. Ensure that only trusted individuals have access to this location.
- Avoid Sharing: Never share your seed phrase with anyone. Your seed phrase provides full access to your wallet and funds, and sharing it can result in unauthorized access.
- Test Recovery:
- Verify Backup: After writing down your seed phrase, verify it by recovering your wallet on a different device or wallet application. This ensures that you have correctly recorded the phrase and can recover your wallet if needed.
Setting Strong Passwords
Setting a strong password for your wallet is essential to protect it from unauthorized access. Here are some tips for creating and managing strong passwords:
- Create a Strong Password:
- Complexity: Use a combination of uppercase and lowercase letters, numbers, and special characters. Avoid using easily guessable information like common words, names, or birthdates.
- Length: Aim for a password that is at least 12 characters long. Longer passwords are generally more secure and harder to crack.
- Use a Password Manager:
- Secure Storage: Use a reputable password manager to store and manage your passwords securely. Password managers can generate complex passwords and save them, so you don’t have to remember each one.
- Unique Passwords: Ensure that you use unique passwords for each of your accounts and services. A password manager makes it easy to maintain different passwords without the risk of forgetting them.
- Enable Two-Factor Authentication (2FA):
- Additional Security: Enable two-factor authentication (2FA) on your wallet and related accounts whenever possible. 2FA requires a second verification step, such as a code sent to your phone, adding an extra layer of security.
- Regularly Update Passwords:
- Periodic Changes: Regularly update your passwords to reduce the risk of unauthorized access. Avoid reusing old passwords or slight variations of them.
Connecting Wallet to Uniswap
Accessing Uniswap Website
To start using Uniswap with your MetaMask or Trust Wallet, you first need to access the Uniswap website. Here’s how to do it:
- Open Your Browser:
- Browser Extension Users (MetaMask): Open Google Chrome, Firefox, or Brave browser where you have the MetaMask extension installed.
- Mobile Wallet Users (MetaMask or Trust Wallet): Open the built-in browser in the MetaMask or Trust Wallet app.
- Navigate to Uniswap:
- Enter URL: In the browser’s address bar, type uniswap.org and press enter. Ensure you are visiting the correct URL to avoid phishing sites.
- Access Interface: Click “Launch App” on the Uniswap homepage to open the Uniswap interface.
Authorizing Wallet Connection
Once you’ve accessed the Uniswap website, you need to connect your wallet to interact with the platform. Here’s how to authorize the connection:
- Initiate Connection:
- Click Connect Wallet: On the Uniswap interface, click the “Connect Wallet” button located in the upper right corner of the screen.
- Select Your Wallet:
- MetaMask Users:
- Browser Extension: Select “MetaMask” from the list of supported wallets. This will prompt the MetaMask extension to open a connection request.
- Mobile App: If using the MetaMask mobile app’s browser, select “MetaMask” and authorize the connection within the app.
- Trust Wallet Users:
- Mobile App: If using the Trust Wallet app’s browser, select “WalletConnect” from the list of supported wallets. This will prompt you to scan a QR code.
- MetaMask Users:
- Authorize the Connection:
- MetaMask Users:
- Browser Extension: A MetaMask pop-up will appear, asking you to connect your wallet to Uniswap. Review the connection request and click “Next,” then “Connect” to authorize the connection.
- Mobile App: Follow the prompts within the MetaMask app to authorize the connection.
- Trust Wallet Users:
- Scan QR Code: Open the Trust Wallet app, select WalletConnect, and scan the QR code displayed on the Uniswap website. Follow the prompts to authorize the connection.
- MetaMask Users:
- Confirm Connection:
- Verify Wallet Address: Once connected, your wallet address should be displayed in the upper right corner of the Uniswap interface, indicating a successful connection.
- Start Using Uniswap:
- Swapping Tokens: You can now start swapping tokens directly through the Uniswap interface. Select the tokens you want to trade, enter the amounts, and confirm the transaction.
- Providing Liquidity: Add liquidity to various pools by selecting the “Pool” tab, choosing the token pair, and specifying the amounts.
- Managing Assets: Use your wallet to monitor your transactions, view your portfolio, and manage your assets. The wallet extension or app will display real-time updates and transaction confirmations.

Performing Your First Swap
Selecting Tokens to Trade
To perform your first token swap on Uniswap, follow these steps:
- Open Uniswap Interface:
- Access Uniswap: Ensure you are connected to the Uniswap interface through your browser or wallet app as previously described.
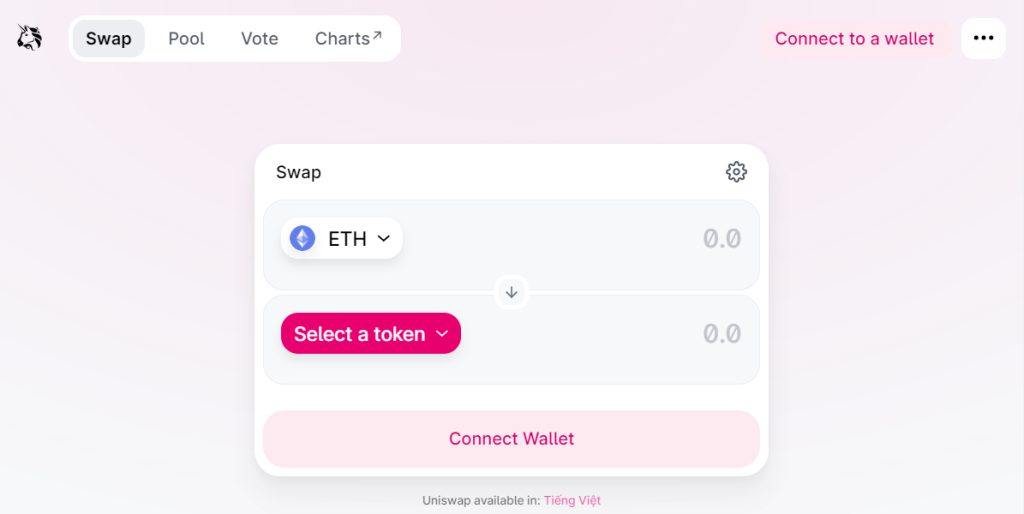
- Navigate to the Swap Page:
- Select Swap Tab: On the Uniswap interface, click the “Swap” tab to access the token swapping feature.
- Choose Tokens:
- Select Input Token: Click on the token dropdown menu in the “From” field to select the token you want to swap. You can search for the token by name or paste its contract address if it’s not listed.
- Select Output Token: Click on the token dropdown menu in the “To” field to select the token you want to receive. Again, you can search for the token by name or paste its contract address if it’s not listed.
- Enter Amount:
- Specify Amount: Enter the amount of the input token you want to swap. The interface will automatically calculate the equivalent amount of the output token based on the current exchange rate.
- Review Transaction Details:
- Check Rates: Review the exchange rate, slippage tolerance, and any associated fees. Uniswap provides a real-time preview of these details.
Confirming the Transaction
After selecting your tokens and entering the desired amount, you need to confirm the transaction to execute the swap. Here’s how to do it:
- Initiate Swap:
- Click Swap: Once you’ve reviewed the transaction details, click the “Swap” button to initiate the transaction.
- Review Confirmation:
- Transaction Summary: A pop-up will appear summarizing the transaction details, including the amount of tokens you are swapping, the expected output, the price impact, and any fees.
- Confirm Swap: Review the details carefully. If everything looks correct, click “Confirm Swap” to proceed.
- Authorize in Wallet:
- MetaMask Users:
- Extension: A MetaMask pop-up will appear, asking you to confirm the transaction. Review the gas fee and total amount, then click “Confirm” to authorize the transaction.
- Mobile App: Follow similar prompts within the MetaMask mobile app to confirm the transaction.
- Trust Wallet Users:
- Authorize Transaction: Trust Wallet will prompt you to approve the transaction. Review the details and tap “Confirm” to authorize the transaction.
- MetaMask Users:
- Wait for Confirmation:
- Transaction Processing: The transaction will be submitted to the Ethereum network. Wait for the transaction to be confirmed. This may take a few moments depending on network congestion.
- Transaction Status: You can monitor the status of your transaction within your wallet app or through a block explorer like Etherscan. Uniswap will also display a notification once the transaction is confirmed.
- Transaction Complete:
- Receive Tokens: Once the transaction is confirmed, you will receive the output tokens in your wallet. You can check your wallet balance to verify that the tokens have been successfully swapped.
Managing Your Assets on Uniswap
Adding and Removing Liquidity
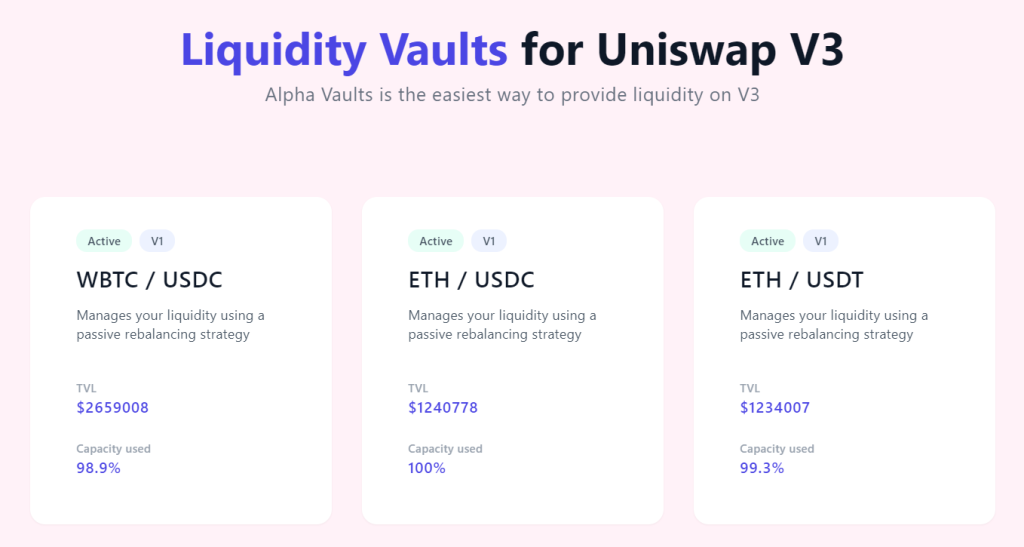
Providing liquidity on Uniswap allows you to earn fees from trades that occur in the pool you contribute to. Here’s how to add and remove liquidity:
- Adding Liquidity:
- Access Pool Page: On the Uniswap interface, click the “Pool” tab to access the liquidity pools.
- Add Liquidity: Click “Add Liquidity” to begin the process.
- Select Token Pair: Choose the token pair you want to provide liquidity for. You need to provide an equal value of both tokens.
- Enter Amounts: Enter the amount of each token you want to add. The interface will show the equivalent amount of the other token required.
- Review Details: Review the pool share you will receive, the potential earnings, and any fees.
- Approve Tokens: If this is your first time providing liquidity with these tokens, you may need to approve the tokens. Click “Approve” and confirm the transaction in your wallet.
- Supply Liquidity: Click “Supply” to add liquidity. Confirm the transaction in your wallet and wait for it to be processed by the Ethereum network.
- Transaction Confirmation: Once confirmed, you will receive pool tokens representing your share of the liquidity pool.
- Removing Liquidity:
- Access Pool Page: Go to the “Pool” tab and find the pool you have provided liquidity to.
- Remove Liquidity: Click “Remove” next to the pool you want to withdraw from.
- Select Amount: Enter the amount of liquidity you want to remove. You can specify a percentage or a specific amount.
- Review Details: Review the amount of each token you will receive and any fees.
- Confirm Removal: Click “Approve” if necessary, then “Remove” and confirm the transaction in your wallet.
- Transaction Confirmation: Once confirmed, the tokens will be returned to your wallet, minus any fees, and your pool tokens will be burned.
Monitoring Transaction History
Keeping track of your transaction history is essential for managing your assets effectively. Here’s how to monitor your transaction history on Uniswap:
- In Your Wallet:
- MetaMask: Open the MetaMask extension or mobile app. Navigate to the “Activity” tab to view your recent transactions, including swaps and liquidity actions.
- Trust Wallet: Open the Trust Wallet app and go to the “Transactions” tab to see a detailed history of your transactions.
- Using Etherscan:
- Access Etherscan: Go to etherscan.io and enter your wallet address in the search bar.
- View Transactions: Etherscan provides a detailed list of all transactions associated with your address, including swaps, liquidity provision, and other interactions with Uniswap.
- Transaction Details: Click on individual transactions to see more details, such as gas fees, token amounts, and transaction status.
- Uniswap Interface:
- Transaction Overview: While Uniswap itself does not have a built-in transaction history feature, it interacts directly with your wallet. By checking your wallet’s transaction history, you can track all interactions with Uniswap.
- Using Portfolio Trackers:
- DeFi Trackers: Consider using DeFi portfolio trackers like Zapper, Zerion, or Debank. These platforms can connect to your wallet and provide a comprehensive overview of your transactions, liquidity positions, and overall portfolio performance.
- Set Up Account: Create an account on a portfolio tracker platform and connect your wallet. These tools often offer more detailed analytics and historical data.