
To switch to Uniswap v3, visit the official Uniswap website and click on “Launch App.” Once in the app, ensure your wallet is connected by clicking “Connect Wallet” and selecting your provider. In the interface, use the toggle or dropdown menu to switch from v2 to v3. Confirm the switch and you’re ready to use Uniswap v3.
Understanding Uniswap v3
Key Features of Uniswap v3
Uniswap v3 introduces several innovative features that distinguish it from previous versions and other decentralized exchanges:
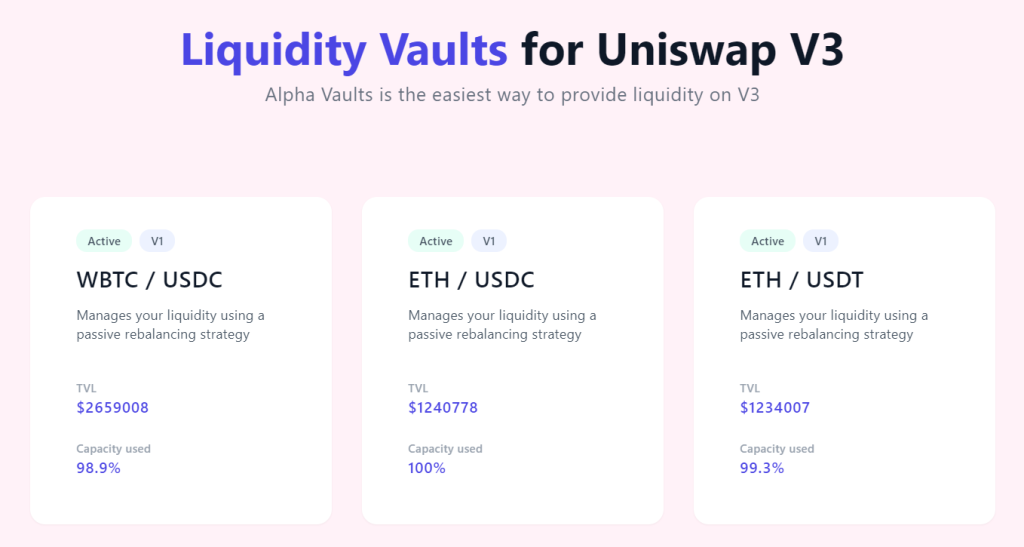
- Concentrated Liquidity: Liquidity providers (LPs) can allocate liquidity within specific price ranges, allowing for more efficient use of capital and higher potential returns.
- Multiple Fee Tiers: Uniswap v3 offers multiple fee tiers (0.05%, 0.30%, and 1.00%), enabling LPs to be compensated according to the risk level of the trading pair.
- Range Orders: This feature allows LPs to provide liquidity similar to limit orders, earning fees as the market price moves through their specified range.
- Improved Oracle Services: Uniswap v3 enhances its price oracle capabilities, making it more secure and less susceptible to manipulation.
- Non-Fungible Liquidity: Each liquidity position is represented as an NFT (non-fungible token), allowing for more personalized and flexible liquidity management.
Benefits of Upgrading to Uniswap v3
Upgrading to Uniswap v3 offers several significant advantages for both traders and liquidity providers:
- Higher Capital Efficiency: LPs can concentrate their liquidity in narrower price ranges, leading to higher capital efficiency and greater returns on investment.
- Increased Flexibility: With customizable fee tiers and range orders, LPs have more control over their investment strategies and risk management.
- Enhanced Earnings: By concentrating liquidity, LPs can earn more trading fees, especially in highly volatile markets.
- Improved Security: Upgraded oracle services and advanced smart contract features enhance the overall security and reliability of the platform.
- Better Market Conditions: Traders benefit from tighter spreads and lower slippage, improving the overall trading experience on the platform.
- Comprehensive Analytics: Uniswap v3 provides detailed analytics and tools for LPs to monitor their positions and optimize their strategies effectively.
Preparing Your Wallet for Uniswap v3
Updating Your MetaMask or Other Wallet
To ensure a seamless experience with Uniswap v3, it’s crucial to keep your wallet up-to-date. Here’s how to do it:
- Check for Updates: Regularly check for updates in your wallet application. For MetaMask, updates are typically pushed automatically, but you can manually check in the browser extensions or app settings.
- Install Latest Version: Make sure you are using the latest version of MetaMask or your preferred wallet. This ensures compatibility with Uniswap v3 and incorporates the latest security features.
- Backup Your Wallet: Before updating, ensure that you have backed up your wallet’s seed phrase or private keys. This will help you recover your wallet if any issues arise during the update process.
- Test the Update: After updating, perform a small transaction to ensure that everything is functioning correctly and your wallet is properly connected to Uniswap v3.
Ensuring Sufficient Funds
Having sufficient funds in your wallet is essential for trading and providing liquidity on Uniswap v3. Here’s how to prepare:
- Check Your Balance: Verify that you have enough ETH in your wallet to cover transaction fees (gas) and the tokens you intend to trade or provide as liquidity.
- Add Funds if Necessary: If your balance is low, you can add funds by:
- Buying ETH or Tokens: Purchase ETH or other required tokens directly through your wallet or from a reputable exchange like Binance, Coinbase, or Kraken.
- Transferring from Another Wallet: Transfer ETH or tokens from another wallet to your MetaMask or preferred wallet. Ensure you copy the correct wallet address to avoid errors.
- Estimate Gas Fees: Gas fees on the Ethereum network can fluctuate. Use tools like ETH Gas Station or Etherscan’s Gas Tracker to estimate current gas fees and ensure you have enough ETH to cover these costs.
- Consider Network Congestion: During times of high network congestion, gas fees can be significantly higher. Plan your transactions accordingly to avoid excessive fees.
Accessing the Uniswap v3 Interface
Navigating to the Official Uniswap Website
To start using Uniswap v3, you need to access the official Uniswap website. Follow these steps to ensure you are on the correct platform:
- Open Your Browser: Use a secure and updated web browser for the best experience.
- Enter the URL: Type in the official URL: https://uniswap.org. Avoid clicking on links from unofficial sources to prevent phishing attacks.
- Verify the Website: Ensure that the URL is correct and that you see security indicators like a padlock icon in the address bar, which signifies a secure connection.
- Navigate to the App: On the Uniswap homepage, click on the “Launch App” button, which will redirect you to the Uniswap trading interface.
Selecting the v3 Option
Once you are in the Uniswap app, follow these steps to switch to Uniswap v3:
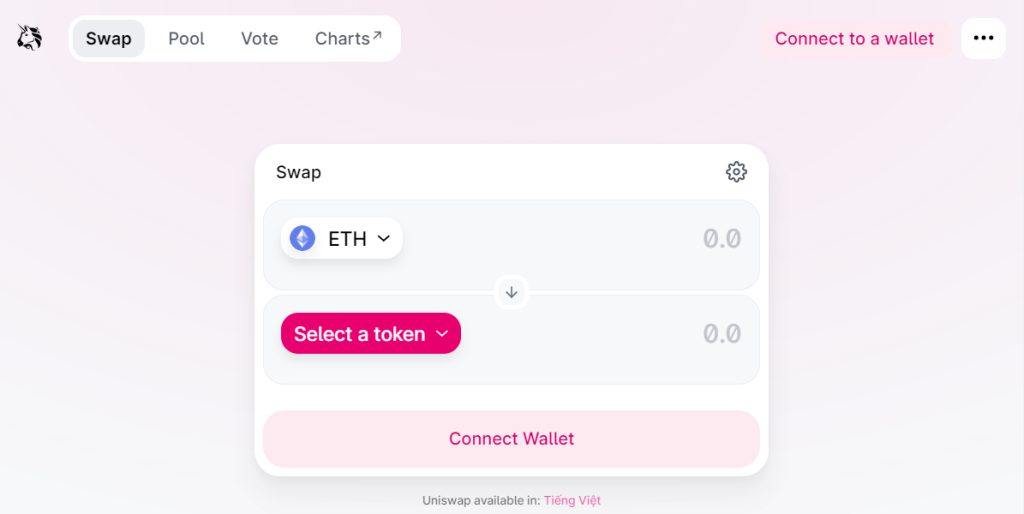
- Connect Your Wallet: If not already connected, click on the “Connect Wallet” button in the top-right corner. Select your wallet provider (e.g., MetaMask) and authorize the connection.
- Switch to v3: In the Uniswap interface, there should be an option to choose between different versions of Uniswap. Look for a toggle or dropdown menu that allows you to select Uniswap v3.
- Confirm Selection: After selecting Uniswap v3, the interface will reload to reflect the v3 environment. You should now see features specific to Uniswap v3, such as concentrated liquidity and multiple fee tiers.
- Verify Connection: Ensure that your wallet is properly connected and that your balances are displayed correctly. You are now ready to trade or provide liquidity using Uniswap v3.
Connecting Your Wallet to Uniswap v3
Authorizing the Connection
To start using Uniswap v3, you need to connect and authorize your wallet. Follow these steps:
- Open the Uniswap App: Navigate to the Uniswap app interface by clicking “Launch App” on the Uniswap website.
- Connect Your Wallet: Click on the “Connect Wallet” button in the top-right corner of the interface.
- Select Wallet Provider: A pop-up will appear with a list of wallet providers. Choose your wallet (e.g., MetaMask, WalletConnect, Coinbase Wallet).
- Authorize Connection: If you’re using MetaMask, a MetaMask window will open asking you to connect. Select the account you want to use and click “Next.” Then, click “Connect” to authorize Uniswap to access your wallet.
- Confirm Connection: After authorization, the Uniswap interface will show your wallet address and balance, confirming that the connection is successful.
Managing Multiple Wallets
If you use multiple wallets or accounts, managing them efficiently is crucial. Here’s how you can switch between and manage multiple wallets on Uniswap v3:
- Disconnect Wallet: To switch wallets, first disconnect the current wallet. Click on the wallet icon or address in the top-right corner and select “Disconnect” or “Log out.”
- Connect a Different Wallet: Follow the steps in the “Authorizing the Connection” section to connect a different wallet. Choose the appropriate wallet provider and authorize the connection as before.
- Use WalletConnect for Multiple Accounts: WalletConnect allows you to connect various wallets using QR codes. This is useful if you manage multiple wallets across different devices.
- Switching Accounts in MetaMask: If you use MetaMask with multiple accounts, click on the MetaMask icon in your browser, switch to the desired account, and then reconnect to Uniswap.
- Label and Organize Wallets: Label your wallets within MetaMask or your wallet provider to easily identify them. This helps in avoiding mistakes when switching between accounts.
Migrating Liquidity to Uniswap v3
Removing Liquidity from v2 Pools
To migrate your liquidity from Uniswap v2 to v3, you first need to remove it from the v2 pools. Here’s how to do it:
- Access Uniswap v2 Interface: Go to the Uniswap app and ensure you are in the v2 interface. You can switch between versions using the interface toggle if needed.
- Connect Your Wallet: Make sure your wallet is connected. Click on “Connect Wallet” and select your wallet provider.
- Navigate to Pools: Click on the “Pool” tab to view your liquidity positions.
- Select Your Position: Find the liquidity position you want to remove and click on it.
- Remove Liquidity: Click “Remove” and specify the amount of liquidity you want to withdraw. Confirm the transaction and approve it in your wallet. You may need to approve the token transfer if this is your first time removing liquidity.
- Confirm Transaction: After the transaction is confirmed, the tokens (both liquidity tokens and any remaining assets) will be returned to your wallet.
Adding Liquidity to v3 Pools
Once you have withdrawn your liquidity from v2, you can add it to a v3 pool. Follow these steps:
- Access Uniswap v3 Interface: Switch to the v3 interface on the Uniswap app.
- Connect Your Wallet: Ensure your wallet is connected. If you switched interfaces, you might need to reconnect.
- Navigate to Pools: Click on the “Pool” tab and select “Add Liquidity.”
- Select Token Pair: Choose the token pair you want to provide liquidity for. Ensure you have sufficient balances of both tokens in your wallet.
- Set Price Range: One of the key features of v3 is the ability to set a price range for your liquidity. Specify the minimum and maximum prices within which you want to provide liquidity.
- Select Fee Tier: Choose the fee tier for your liquidity position (0.05%, 0.30%, or 1.00%). This determines the trading fees you will earn.
- Enter Amounts: Input the amounts of each token you want to add. Uniswap will calculate the necessary amounts based on your price range and current prices.
- Approve Tokens: If this is your first time providing liquidity with these tokens, you will need to approve each token for transfer.
- Add Liquidity: After approving the tokens, click “Add Liquidity” and confirm the transaction in your wallet.
- Confirm Transaction: Once the transaction is confirmed, your liquidity position will be active. You will receive an NFT representing your position, which includes details about your specified price range and fee tier.

Understanding Uniswap v3 Fee Tiers
Choosing the Right Fee Tier
Uniswap v3 introduces multiple fee tiers to provide more flexibility and to better match the risk and return profiles of different trading pairs. Here’s how to choose the right fee tier:
- 0.05% Fee Tier: This lowest fee tier is suitable for stablecoin pairs or pairs with very low volatility. Examples include USDC/DAI or USDT/USDC. These pairs are less likely to experience significant price fluctuations, reducing impermanent loss risks.
- 0.30% Fee Tier: This is the standard fee tier, ideal for most trading pairs with moderate volatility. Common pairs such as ETH/USDC or ETH/DAI fit well in this category. This tier balances between earning trading fees and managing risk from price swings.
- 1.00% Fee Tier: The highest fee tier is designed for highly volatile or exotic pairs. Examples include new or less liquid tokens with unpredictable price movements. This tier compensates liquidity providers for taking on more significant risk by offering higher fees.
When choosing a fee tier, consider the following:
- Volatility: Assess the volatility of the trading pair. Higher volatility generally means higher risk, warranting a higher fee tier to compensate for potential impermanent loss.
- Trading Volume: Higher trading volumes can generate more fees. If a pair trades frequently, even a lower fee tier can be profitable.
- Market Trends: Monitor market trends and news that might impact the volatility and trading volume of the pairs you’re interested in.
Managing Transaction Costs
Transaction costs, or gas fees, can significantly impact your profitability on Uniswap v3. Here’s how to manage these costs effectively:
- Monitor Gas Prices: Gas prices on the Ethereum network can fluctuate significantly. Use tools like ETH Gas Station or Etherscan’s Gas Tracker to monitor current gas prices and choose the optimal time for transactions.
- Set Gas Limits: Adjust your gas limit based on the complexity of the transaction. While higher limits can ensure faster transactions, they also cost more. For simpler trades or liquidity additions, you might not need a high gas limit.
- Batch Transactions: If you need to perform multiple transactions, try batching them into a single transaction when possible. This can reduce overall gas costs.
- Use Layer 2 Solutions: Consider using Layer 2 solutions like Optimism or Arbitrum that offer lower gas fees and faster transaction times. Uniswap supports these solutions, making it easier to trade and provide liquidity with reduced costs.
- Avoid Peak Times: Gas fees tend to spike during peak usage times. Plan your transactions during off-peak hours to benefit from lower fees.
- Token Approval Optimization: When adding liquidity or making trades, you might need to approve token transfers. Approve only the required amount instead of using unlimited approvals to reduce the risk and potential future costs.
Troubleshooting Common Issues
Connection Problems
If you’re experiencing connection problems with Uniswap v3, here are some common solutions:
- Refresh the Page: Sometimes, a simple page refresh can resolve connection issues. Press F5 or click the refresh button in your browser.
- Reconnect Wallet: Disconnect and reconnect your wallet. Click on the wallet icon in the top-right corner, select “Disconnect,” then “Connect Wallet,” and follow the prompts to reconnect.
- Check Browser Extensions: Other browser extensions can interfere with MetaMask. Try disabling other extensions temporarily to see if this resolves the issue.
- Update Your Browser and Wallet: Ensure both your browser and MetaMask (or other wallet) are updated to the latest versions. Outdated software can cause compatibility issues.
- Clear Browser Cache: Clearing your browser’s cache and cookies can sometimes fix connection problems. Navigate to your browser settings to perform this action.
- Switch Networks: If you’re on a test network or a custom network, switch back to the Ethereum Mainnet in MetaMask.
- Firewall and Security Settings: Check your firewall and security settings to ensure they are not blocking the Uniswap site or wallet connections.
Transaction Failures
Transaction failures can occur for various reasons. Here’s how to troubleshoot them:
- Insufficient Gas Fees: One of the most common reasons for transaction failures is insufficient gas fees. Ensure you have enough ETH in your wallet to cover the gas costs. Use tools like ETH Gas Station to estimate the current gas prices and adjust accordingly.
- Increase Gas Limit: For complex transactions, the default gas limit might be too low. Increase the gas limit manually in your wallet settings before confirming the transaction.
- Pending Transactions: If you have pending transactions in your wallet, they can block new transactions. Speed up or cancel the pending transactions from the MetaMask interface.
- Token Approvals: Ensure you have approved the token for transfer if it’s your first time trading or adding liquidity. This requires an initial approval transaction, which must be confirmed before proceeding with the main transaction.
- Network Congestion: High network congestion can cause delays and failures. Consider executing your transaction during off-peak hours when the network is less busy.
- Slippage Tolerance: Set an appropriate slippage tolerance in the Uniswap interface. If the market is volatile, a low slippage tolerance can cause the transaction to fail. Increase the slippage tolerance to accommodate price fluctuations.
- Correct Contract Address: Ensure you are interacting with the correct token contract address. Verify this information on trusted sources like CoinMarketCap or Etherscan to avoid mistakes.
- Retry Transaction: If all else fails, try resubmitting the transaction. Sometimes, the Ethereum network can have temporary issues that resolve upon a retry.