
To use Uniswap v3, you don’t need to buy it as it’s a decentralized exchange protocol. Instead, access it via a web3-compatible browser at uniswap-v3.vn, connect your Ethereum wallet (like MetaMask), and start trading or providing liquidity by swapping tokens directly on the platform.
Understanding Uniswap v3
What is Uniswap v3?
Uniswap v3 is the latest iteration of the Uniswap decentralized exchange protocol, built on the Ethereum blockchain. It allows users to trade Ethereum-based tokens directly from their wallets without relying on a central authority. This version introduces significant improvements over its predecessors, aiming to enhance capital efficiency and provide greater flexibility for liquidity providers. Key aspects of Uniswap v3 include:
- Decentralized Trading: Users can trade tokens directly from their wallets, ensuring full control over their assets.
- Automated Market Maker (AMM): Utilizes smart contracts to create liquidity pools where trades are executed automatically.
- Non-Custodial: Users maintain ownership of their private keys and funds at all times, reducing the risk of centralized hacks or fraud.
Key Features of Uniswap v3
Uniswap v3 incorporates several innovative features that distinguish it from previous versions and other decentralized exchanges:
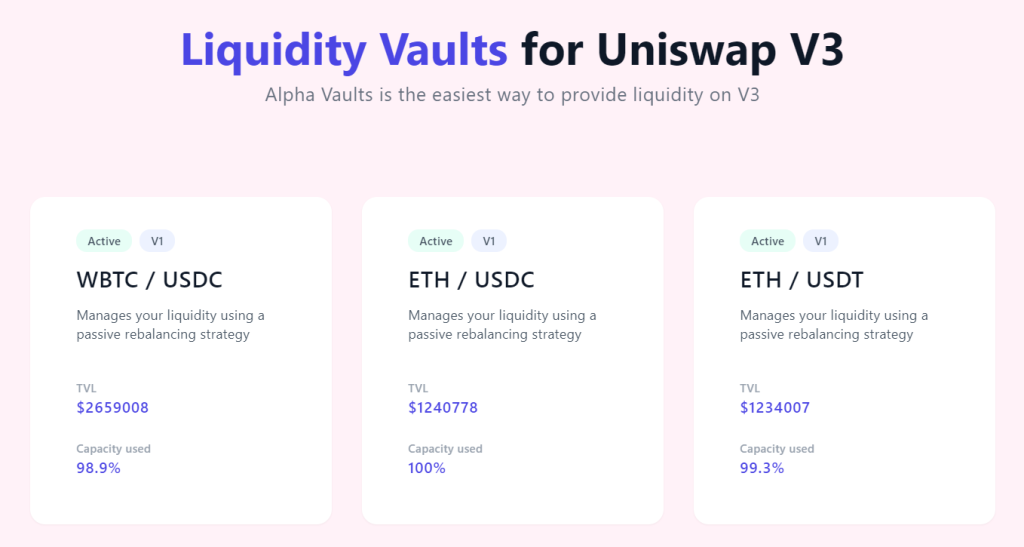
- Concentrated Liquidity: This feature allows liquidity providers to concentrate their capital within specific price ranges. By doing so, they can provide more liquidity with less capital, enhancing capital efficiency and increasing potential returns.
- Improved Capital Efficiency: Liquidity is allocated more precisely, ensuring higher utilization of funds and better returns for liquidity providers.
- Active Liquidity Management: Providers can adjust their positions dynamically to match market conditions, optimizing their strategies for better performance.
- Customizable Fee Tiers: Uniswap v3 offers multiple fee tiers (e.g., 0.05%, 0.30%, 1%), allowing liquidity providers to choose a fee structure that aligns with their risk tolerance and market conditions.
- Increased Earning Potential: Different fee tiers cater to various market dynamics, enabling providers to maximize their fee income based on the volatility and trading volume of specific pairs.
- Flexible Risk Management: Providers can select fee tiers that match their risk preferences, balancing between higher fees and exposure to price fluctuations.
- Improved Price Oracles: Uniswap v3 enhances the accuracy and reliability of its price oracles, which are essential for various DeFi applications that rely on precise pricing information.
- Time-Weighted Average Prices (TWAPs): These provide more stable and less manipulable price data, crucial for secure DeFi operations.
- Enhanced Security: Improved oracle mechanisms reduce the risk of price manipulation, ensuring more reliable data for smart contracts and DeFi platforms.
- Non-Fungible Liquidity Positions: Unlike previous versions, liquidity positions in Uniswap v3 are represented as non-fungible tokens (NFTs), providing unique identification and greater customization.
- Unique Liquidity Positions: Each liquidity position is unique and customizable, offering greater flexibility for liquidity providers.
- Tradable Liquidity NFTs: Liquidity providers can trade their positions as NFTs, adding a new dimension of liquidity and investment opportunities.

Setting Up Your Wallet
Choosing a Compatible Wallet
To use Uniswap v3, you need an Ethereum-compatible wallet. Here are some of the most popular and secure options:
- MetaMask: A widely-used browser extension wallet that supports Ethereum and ERC-20 tokens. It is known for its user-friendly interface and robust security features.
- Trust Wallet: A mobile wallet that supports multiple blockchains, including Ethereum. It offers an integrated DApp browser, making it easy to access Uniswap.
- Coinbase Wallet: A mobile wallet provided by Coinbase, offering seamless integration with Uniswap and other decentralized applications.
- WalletConnect: A protocol that allows you to connect various mobile wallets to DApps on your desktop by scanning a QR code.
Each wallet has its own features and benefits, so choose one that best fits your needs for security, convenience, and functionality.
Installing and Setting Up MetaMask
MetaMask is one of the most popular wallets for interacting with decentralized applications like Uniswap. Follow these steps to install and set up MetaMask:
Installation
- Download MetaMask: Visit the official MetaMask website and download the browser extension for Chrome, Firefox, or Brave. Ensure you are downloading from the official site to avoid phishing attacks.
- Install the Extension: Follow the installation prompts to add the MetaMask extension to your browser.
Setting Up MetaMask
- Create a New Wallet:
- Open MetaMask: Click on the MetaMask icon in your browser toolbar to open the extension.
- Get Started: Click on “Get Started” to begin the wallet setup process.
- Create Wallet: Select “Create a Wallet” and agree to the terms and conditions.
- Create a Password: Set a strong password for your wallet. This will be used to access the wallet on your device.
- Secure Your Seed Phrase: MetaMask will generate a 12-word seed phrase. Write this down and store it in a safe, offline location. This phrase is crucial for recovering your wallet if you lose access to your device. Never share your seed phrase with anyone.
- Import an Existing Wallet:
- Open MetaMask: Click on the MetaMask icon in your browser toolbar to open the extension.
- Get Started: Click on “Get Started” to begin the wallet setup process.
- Import Wallet: Select “Import Wallet” and enter your 12-word seed phrase from your existing wallet.
- Create a Password: Set a strong password to secure your MetaMask wallet on your device.
Funding Your Wallet
- Buy Ethereum (ETH): Purchase ETH from a cryptocurrency exchange like Coinbase, Binance, or Kraken. Follow the exchange’s instructions to complete the purchase.
- Transfer ETH to MetaMask:
- Open MetaMask: Click on the MetaMask icon and log in.
- Copy Wallet Address: Click on your account name to copy your MetaMask wallet address.
- Transfer Funds: Go to your exchange account, initiate a withdrawal, and paste your MetaMask address. Complete the transaction and wait for the ETH to appear in your MetaMask wallet.
Funding Your Wallet
Buying Ethereum (ETH)
To use Uniswap v3, you need to have Ethereum (ETH) in your wallet, as it is used for both trading and paying transaction fees. Here are the steps to buy ETH:
Choosing an Exchange
Select a reputable cryptocurrency exchange where you can buy ETH. Some popular exchanges include:
- Coinbase: User-friendly and great for beginners.
- Binance: Offers a wide variety of cryptocurrencies and trading options.
- Kraken: Known for its security and low fees.
Creating an Account
- Sign Up: Visit the exchange’s website and create an account by providing your email address and creating a password.
- Verify Your Identity: Complete the KYC (Know Your Customer) process by providing personal information and uploading identification documents as required by the exchange.
Buying Ethereum
- Deposit Funds: Deposit fiat currency (such as USD, EUR, or your local currency) into your exchange account. This can usually be done via bank transfer, credit/debit card, or other payment methods supported by the exchange.
- Purchase ETH: Navigate to the trading section of the exchange, select ETH as the cryptocurrency to buy, and enter the amount you wish to purchase. Confirm the transaction to buy ETH.
Transferring ETH to Your Wallet
Once you have purchased ETH on an exchange, you need to transfer it to your Ethereum wallet (such as MetaMask) to use it on Uniswap v3. Follow these steps:
Preparing Your Wallet
- Open MetaMask: Click on the MetaMask extension in your browser toolbar to open the wallet.
- Copy Your Wallet Address: Click on your account name at the top of the MetaMask interface to copy your wallet address to the clipboard.
Initiating the Transfer
- Log In to the Exchange: Sign in to your exchange account where you bought ETH.
- Navigate to the Withdrawal Section: Find the section for withdrawing funds, usually labeled as “Withdraw” or “Send.”
- Enter Wallet Address: Paste your MetaMask wallet address into the recipient field. Double-check the address to ensure it is correct, as cryptocurrency transactions cannot be reversed.
- Specify Amount: Enter the amount of ETH you want to transfer to your MetaMask wallet. Be mindful of any withdrawal fees charged by the exchange.
- Confirm the Transfer: Review the details and confirm the transaction. You may need to complete additional security steps, such as entering a code sent to your email or phone.
Confirming the Transfer
- Check Transaction Status: After initiating the transfer, you can monitor its status on the exchange. It may take a few minutes for the transaction to be processed and confirmed on the Ethereum blockchain.
- Verify Receipt in MetaMask: Once the transaction is confirmed, open your MetaMask wallet to ensure that the ETH has been received. The balance should update to reflect the new amount.
Accessing the Uniswap Platform
Navigating to Uniswap
To start using Uniswap v3, you need to access the platform through a web3-compatible browser. Here’s how to navigate to Uniswap safely:
Official Website
- Visit the Official Site: Open your browser and go to uniswap-v3.vn. This is the official site for accessing the Uniswap platform.
- Bookmark the URL: To avoid phishing sites, bookmark this URL and always use the bookmark for future visits.
Web3-Compatible Browsers
- MetaMask: Ensure you have the MetaMask browser extension installed and set up.
- Trust Wallet: Use the Trust Wallet app’s built-in DApp browser for mobile access.
- Coinbase Wallet: Use the Coinbase Wallet app’s DApp browser or the Wallet extension in a browser.
Connecting Your Wallet to Uniswap
To interact with Uniswap v3, you need to connect your Ethereum wallet. Here’s a step-by-step guide:
Using MetaMask
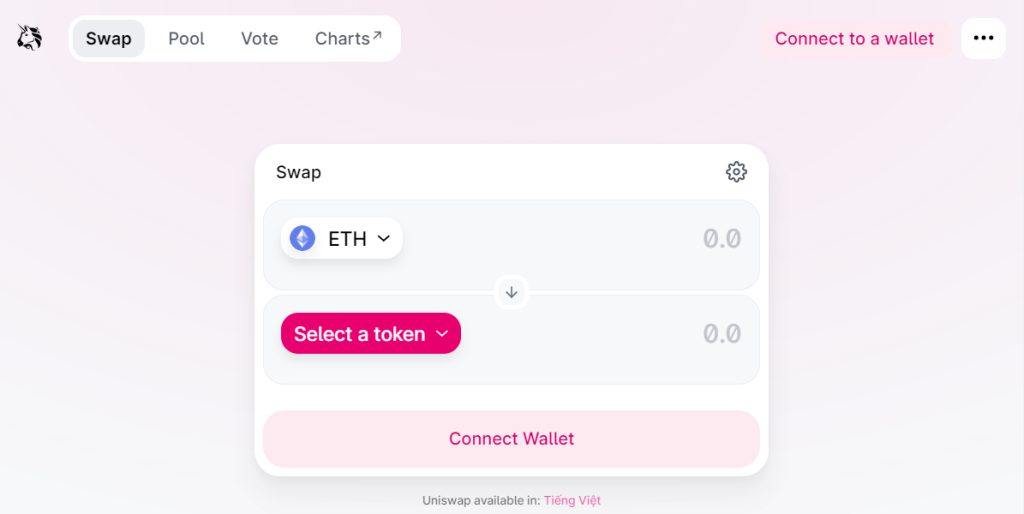
- Open Uniswap: Go to uniswap-v3.vn.
- Connect Wallet: Click on the “Connect Wallet” button at the top right corner of the page.
- Select MetaMask: Choose MetaMask from the list of supported wallets.
- Authorize Connection: MetaMask will prompt you to authorize the connection. Click “Next” and then “Connect” to approve.
- Verify Connection: Once connected, your wallet address will be displayed at the top right corner of the Uniswap interface.
Using Trust Wallet
- Open Trust Wallet: Launch the Trust Wallet app on your mobile device.
- Access DApp Browser: Tap on the DApp browser icon at the bottom of the app.
- Navigate to Uniswap: Enter uniswap-v3.vn in the browser’s address bar.
- Connect Wallet: Tap on “Connect Wallet” and select Trust Wallet from the options.
- Authorize Connection: Trust Wallet will prompt you to authorize the connection. Confirm the connection to link your wallet to Uniswap.
Using Coinbase Wallet
- Open Coinbase Wallet: Launch the Coinbase Wallet app on your mobile device.
- Access DApp Browser: Tap on the DApp browser icon at the bottom of the app.
- Navigate to Uniswap: Enter uniswap-v3.vn in the browser’s address bar.
- Connect Wallet: Tap on “Connect Wallet” and select Coinbase Wallet from the options.
- Authorize Connection: Coinbase Wallet will prompt you to authorize the connection. Confirm the connection to link your wallet to Uniswap.
Swapping Tokens on Uniswap v3
Selecting the Token Pair
To swap tokens on Uniswap v3, you first need to select the token pair you wish to trade. Here’s how to do it:
Open Uniswap Interface
- Visit Uniswap: Go to uniswap-v3.vn and ensure your wallet is connected.
- Navigate to Swap: Click on the “Swap” tab at the top of the interface. This will bring you to the token swap section.
Choose Tokens
- Select Input Token: Click on the token symbol in the “From” field to choose the token you want to swap. A list of available tokens will appear. You can either scroll through the list or type the token name or symbol in the search bar.
- Select Output Token: Click on the token symbol in the “To” field to choose the token you want to receive. Similarly, use the search bar to find the desired token if it is not listed initially.
Verify Token Pair
- Check Details: Ensure you have selected the correct tokens and the correct network (Ethereum mainnet). Verify the token symbols and names to avoid any mistakes.
Executing the Trade
Once you have selected the token pair, you can proceed with executing the trade. Follow these steps:
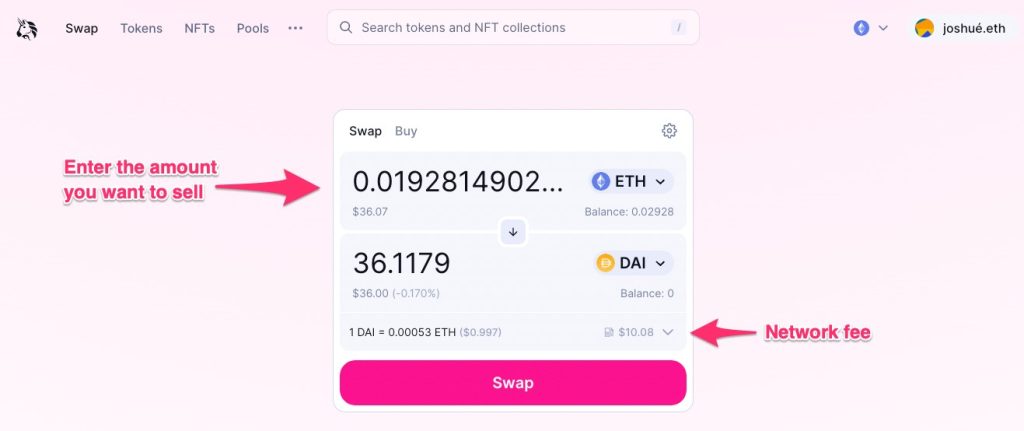
Enter Trade Amount
- Input Amount: Enter the amount of the input token you wish to swap in the “From” field. The “To” field will automatically display the estimated amount of the output token you will receive based on current market rates.
- Check Slippage Tolerance: Slippage tolerance is the maximum percentage difference between the expected price and the executed price. Click on the settings icon (gear symbol) and set your preferred slippage tolerance. A common setting is between 0.5% and 1%.
Review Transaction Details
- Review Estimated Output: Ensure the estimated amount of the output token is acceptable to you. This estimate may change slightly due to price fluctuations.
- Gas Fees: Gas fees will be displayed, showing the estimated cost to execute the transaction on the Ethereum network.
Approve Token (if necessary)
- Token Approval: If this is your first time trading a particular token, you may need to approve it for trading. Click on “Approve [Token]” and confirm the approval transaction in your wallet. This step allows Uniswap to spend your tokens for the swap.
Execute the Swap
- Confirm Swap: Once the token is approved (if required), click on the “Swap” button.
- Confirm in Wallet: Your wallet will prompt you to confirm the transaction. Review the details, including gas fees, and confirm the transaction.
- Wait for Confirmation: The transaction will be submitted to the Ethereum network. Wait for the confirmation, which may take a few seconds to minutes depending on network congestion.
Verify Transaction
- Check Status: After the transaction is confirmed, you can verify it by checking your wallet balance or viewing the transaction details on an Ethereum blockchain explorer like Etherscan.
- Receive Tokens: Once confirmed, the output tokens will appear in your wallet.
Managing Transaction Fees
Understanding Gas Fees
Gas fees are the transaction costs required to execute operations on the Ethereum network. These fees are paid in ETH and are used to compensate miners for processing transactions and securing the network. Here’s a deeper understanding of gas fees:
Components of Gas Fees
- Gas Price: The amount you are willing to pay per unit of gas, typically measured in Gwei (1 Gwei = 0.000000001 ETH). Higher gas prices incentivize miners to prioritize your transaction.
- Gas Limit: The maximum amount of gas you are willing to spend on a transaction. This limits the amount of computational work your transaction can require.
- Total Cost: Calculated as Gas Price * Gas Used. The total gas used depends on the complexity of the transaction.
Factors Influencing Gas Fees
- Network Congestion: High network activity increases competition for block space, leading to higher gas prices.
- Transaction Complexity: More complex transactions, such as those involving smart contracts or DApps like Uniswap, require more gas.
- Priority: Higher gas prices can expedite transaction processing, useful when network congestion is high.
Tips for Reducing Gas Costs
Gas fees can fluctuate significantly, but there are strategies you can use to minimize these costs:
Timing Transactions
- Off-Peak Hours: Execute transactions during times of lower network activity, such as weekends or late nights (UTC time). Gas fees tend to be lower during these periods.
- Gas Fee Tracking Tools: Use tools like Gas Now, Etherscan’s Gas Tracker, or websites like EthGasStation to monitor current gas prices and predict the best times for transactions.
Adjusting Gas Settings
- Set Custom Gas Price: Many wallets allow you to manually set the gas price. Lowering the gas price can save costs but may result in longer confirmation times.
- Use Wallet Recommendations: Wallets like MetaMask offer gas fee recommendations based on network conditions, which can help optimize costs without manual adjustments.
Optimizing Transactions
- Batch Transactions: Combine multiple transactions into one where possible. This can reduce the overall gas cost compared to executing each transaction separately.
- Avoid High Congestion Events: Major network events, such as popular DeFi launches or NFT drops, can spike gas fees. Plan your transactions outside these events.
Layer 2 Solutions
- Layer 2 Networks: Use Layer 2 solutions like Optimism or Arbitrum that offer lower gas fees and faster transactions. These networks work alongside the Ethereum mainnet to offload some of the transaction load.
- Bridges: Utilize bridges to transfer assets to and from Layer 2 networks, enabling you to benefit from reduced fees for regular transactions.
DApp-Specific Optimizations
- Gas Fee Tokens: Some DApps offer token incentives or rebates for gas fees. Check if Uniswap or related services provide such options.
- Limit Transaction Approvals: When approving tokens for trading, set an exact amount rather than granting unlimited approvals. This reduces the need for future approval transactions, saving gas.
Security Best Practices
Avoiding Phishing Scams
Phishing scams are fraudulent attempts to steal your personal information and crypto assets by mimicking legitimate services. Here are some key strategies to avoid phishing scams:
Recognizing Phishing Attempts
- Suspicious URLs: Always verify the URL before entering any sensitive information. Phishing sites often use URLs that are slightly different from the official ones.
- Unsolicited Emails: Be cautious of emails that ask for personal information or direct you to a website. Verify the sender’s address and avoid clicking on links from unknown sources.
- Fake Social Media Accounts: Follow and interact only with verified social media accounts of Uniswap and related services. Scammers often create fake profiles to deceive users.
Safe Browsing Practices
- Use Bookmarks: Bookmark the official Uniswap website (app.uniswap.org) and always use the bookmark to navigate to the site.
- Browser Extensions: Use browser extensions like MetaMask that have built-in phishing protection features. These extensions can help identify and block malicious websites.
- Verify Certificates: Check for HTTPS and valid SSL certificates on websites. A padlock icon in the browser address bar indicates a secure connection.
Double-Check Communications
- Official Channels: Only trust information and links shared through Uniswap’s official channels and website. Double-check announcements through multiple official sources.
- Community Verification: Engage with the Uniswap community on platforms like Discord or Reddit to verify suspicious messages or links. Community members often share warnings about ongoing phishing attempts.
Safeguarding Your Wallet and Private Keys
Keeping your wallet and private keys secure is crucial to protecting your assets. Follow these best practices:
Securing Your Private Keys
- Offline Storage: Store your private keys and seed phrases offline in a secure location. Avoid storing them digitally to prevent hacking risks.
- Multiple Backups: Create multiple backups of your private keys and store them in different secure locations, such as a safe or a secure storage facility.
- Never Share: Never share your private keys or seed phrases with anyone. Legitimate services will never ask for this information.
Using Hardware Wallets
- Hardware Wallets: Use hardware wallets like Ledger or Trezor for storing large amounts of crypto. Hardware wallets provide an extra layer of security by keeping your keys offline.
- Secure Connections: Only connect your hardware wallet to trusted devices and networks to prevent unauthorized access.
Password Management
- Strong Passwords: Use strong, unique passwords for your wallets and associated accounts. Avoid using easily guessable information.
- Password Manager: Consider using a password manager to generate and store complex passwords securely. This reduces the risk of forgetting or losing your passwords.
Enabling Two-Factor Authentication (2FA)
- 2FA: Enable two-factor authentication on your wallet accounts and email. 2FA provides an additional layer of security by requiring a second form of verification.
- Authenticator Apps: Use authenticator apps like Google Authenticator or Authy instead of SMS-based 2FA, as SMS can be more vulnerable to interception.
Regular Monitoring and Updates
- Monitor Transactions: Regularly check your wallet for unauthorized transactions. Early detection of suspicious activity can help mitigate potential losses.
- Software Updates: Keep your wallet software, browser, and any related apps updated to protect against the latest security vulnerabilities.