
To migrate from Uniswap V2 to V3, first withdraw your liquidity from the V2 pools by navigating to the “Pool” tab on the Uniswap V2 interface and selecting “Remove Liquidity.” Then, go to the Uniswap V3 interface at app.uniswap.org, select “New Position,” choose your token pair and fee tier, set your price range, and add your liquidity to V3.
Understanding the Differences Between Uniswap V2 and V3
Key Features of Uniswap V2
Uniswap V2 introduced significant improvements over the original Uniswap protocol, becoming a popular choice for decentralized trading. Here are some of its key features:
Automated Market Maker (AMM) Model
- Liquidity Pools: Uniswap V2 uses liquidity pools where users can provide liquidity by depositing pairs of tokens. These pools facilitate automated trading without the need for an order book.
- Constant Product Formula: The pricing mechanism is based on the constant product formula (x * y = k), ensuring that the product of the token amounts remains constant after a trade.
Pair-Specific Liquidity
- ERC-20/ERC-20 Pairs: Unlike Uniswap V1, which only supported ERC-20/ETH pairs, V2 supports direct trading between any two ERC-20 tokens.
- Liquidity Providers (LPs): Users who provide liquidity earn a share of the 0.30% trading fee proportional to their contribution to the pool.
On-Chain Price Oracles
- Time-Weighted Average Prices (TWAPs): Uniswap V2 includes built-in oracles that calculate time-weighted average prices, enhancing the reliability and security of price data for DeFi applications.
Flash Swaps
- Instant Liquidity: Flash swaps allow users to withdraw assets, use them elsewhere, and return them within the same transaction. This feature provides flexibility and enables complex DeFi strategies without upfront capital.
Key Features of Uniswap V3
Uniswap V3 builds on the success of V2 with several groundbreaking innovations aimed at improving capital efficiency and flexibility for liquidity providers. Here are the key features of Uniswap V3:
Concentrated Liquidity
- Customizable Price Ranges: Liquidity providers can concentrate their capital within specific price ranges where they believe most trading will occur. This targeted allocation leads to more efficient use of capital.
- Higher Capital Efficiency: By focusing liquidity in narrower price bands, providers can earn higher fees with less capital compared to V2’s uniform distribution.
Multiple Fee Tiers
- Customizable Fees: Uniswap V3 offers multiple fee tiers (0.05%, 0.30%, 1%) for each trading pair, allowing liquidity providers to choose their preferred level of risk and potential return based on market volatility.
Non-Fungible Liquidity Positions
- NFT-Based Positions: Each liquidity position in Uniswap V3 is represented as a non-fungible token (NFT). This allows for unique and customizable liquidity management, reflecting the specific price range and amount provided.
- Tradable Positions: The NFT representation enables liquidity positions to be traded or transferred, adding a layer of flexibility and potential market dynamics.
Enhanced Price Oracles
- Improved TWAPs: Uniswap V3 enhances the time-weighted average price mechanism, offering more precise and robust price data. These improvements support better integration with other DeFi protocols that rely on accurate pricing.
Flexible Liquidity Management
- Dynamic Adjustments: Liquidity providers can adjust their positions dynamically based on market conditions, optimizing their strategy for changing price trends and trading volumes.
Preparing to Migrate from V2 to V3
Reviewing Your Current V2 Positions
Before migrating to Uniswap V3, it’s essential to review your existing positions on Uniswap V2. This will help you understand your current investments and prepare for the transition:
Assessing Your Liquidity Pools
- Current Holdings: Check the token pairs and amounts you have provided as liquidity in Uniswap V2. Note the total value locked (TVL) and the proportion of the pool you own.
- Earnings: Review the fees earned from providing liquidity. This includes the 0.30% trading fee share you’ve accumulated.
- Impermanent Loss: Calculate any impermanent loss incurred due to price changes in the token pair since you initially provided liquidity.
Transaction History
- Past Transactions: Examine your transaction history to understand past deposits, withdrawals, and any other interactions with the V2 liquidity pools.
- Performance Metrics: Analyze the performance of your liquidity provision over time, considering factors such as price volatility and trading volume in your pools.
Withdrawing Liquidity
- Preparation: Plan to withdraw your liquidity from Uniswap V2. This involves unstaking your tokens from the liquidity pool, which will return your tokens to your wallet.
- Fees and Timing: Be mindful of gas fees and network congestion. Choosing a time with lower gas fees can save costs when withdrawing your liquidity.
Understanding V3’s Concentrated Liquidity
Uniswap V3 introduces a new concept called concentrated liquidity, which allows liquidity providers to allocate their funds more efficiently within specific price ranges. Here’s what you need to know:
Customizable Price Ranges
- Targeted Liquidity: Unlike V2, where liquidity is distributed uniformly across all price levels, V3 allows you to specify a price range where your liquidity will be active. This means you can concentrate your funds in the price range you believe will see the most trading activity.
- Higher Efficiency: By focusing liquidity in narrower bands, you can achieve higher capital efficiency, earning more fees with less capital.
Managing Liquidity Positions
- Non-Fungible Tokens (NFTs): Each liquidity position in V3 is represented as an NFT. This NFT captures the specific details of your position, including the price range and the amount of tokens provided.
- Adjusting Positions: You can adjust your liquidity positions dynamically. If market conditions change, you can move your liquidity to new price ranges to optimize your returns.
- Fee Tiers: Uniswap V3 offers multiple fee tiers for each trading pair, such as 0.05%, 0.30%, and 1%. Choose the fee tier that aligns with your risk tolerance and expected trading volume for the pair.
Benefits of Concentrated Liquidity
- Maximized Returns: Concentrated liquidity can lead to higher returns on your investment because your funds are more effectively utilized within the chosen price range.
- Reduced Slippage: By providing liquidity within a targeted price band, you help reduce slippage for traders, making Uniswap more attractive for high-volume trades.
- Flexibility: The ability to adjust your price range and fee tier provides greater flexibility in managing your liquidity and adapting to market changes.
Accessing Uniswap V3
Navigating to the Uniswap V3 Interface
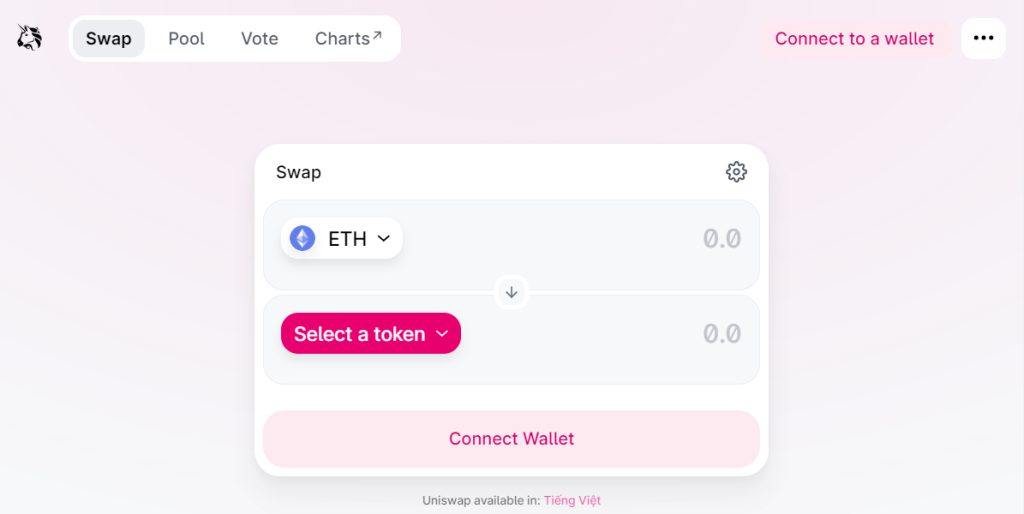
To begin using Uniswap V3, you first need to navigate to its interface. Here’s how to do it:
Official Website
- Visit the Uniswap Website: Open your preferred web browser and go to uniswap-v3.vn.
- Launch App: Click on the “Launch App” button. This will take you to the main interface for Uniswap, which includes both V2 and V3 options.
Direct Access to V3
- Direct URL: You can directly access Uniswap V3 by going to uniswap-v3.vn. This URL will take you to the main trading interface where you can choose to use V3 features.
- Bookmark the URL: To avoid phishing attacks, bookmark the official Uniswap URL and use it for future access.
Interface Navigation
- Select V3: On the Uniswap app interface, you may need to select between V2 and V3 pools. Make sure you are interacting with V3 by selecting the appropriate option.
- Explore Features: Familiarize yourself with the layout and features of the Uniswap V3 interface, including the Swap, Pool, and Analytics tabs.
Connecting Your Wallet to Uniswap V3
To trade or provide liquidity on Uniswap V3, you need to connect your Ethereum wallet. Here’s a step-by-step guide:
Using MetaMask
- Install MetaMask: Ensure you have the MetaMask extension installed in your browser. If not, download it from the official MetaMask website.
- Open MetaMask: Click on the MetaMask icon in your browser toolbar to open the wallet.
- Unlock Wallet: Enter your password to unlock your MetaMask wallet.
Connect Wallet
- Visit Uniswap V3: Go to uniswap-v3.vn.
- Click Connect Wallet: In the top right corner of the Uniswap interface, click on the “Connect Wallet” button.
- Select MetaMask: From the list of supported wallets, choose MetaMask.
- Authorize Connection: A MetaMask popup will appear asking you to connect. Select the account you want to use, then click “Next” and “Connect” to authorize the connection.
- Verify Connection: Your wallet address should now be displayed at the top right corner of the Uniswap interface, indicating that your wallet is connected.
Using Trust Wallet
- Install Trust Wallet: Download and install the Trust Wallet app from the App Store or Google Play.
- Open Trust Wallet: Launch the Trust Wallet app on your mobile device.
- Access DApp Browser: Tap on the DApp browser icon at the bottom of the app.
Connect Wallet
- Navigate to Uniswap V3: Enter uniswap-v3.vn in the DApp browser’s address bar.
- Click Connect Wallet: Tap on the “Connect Wallet” button on the Uniswap interface.
- Select Trust Wallet: Choose Trust Wallet from the list of supported wallets.
- Authorize Connection: Trust Wallet will prompt you to confirm the connection. Approve the connection to link your wallet to Uniswap.
- Verify Connection: Your wallet address will be shown on the Uniswap interface, confirming the connection.
Using Coinbase Wallet
- Install Coinbase Wallet: Download the Coinbase Wallet app from the App Store or Google Play.
- Open Coinbase Wallet: Launch the Coinbase Wallet app on your mobile device.
- Access DApp Browser: Tap on the DApp browser icon within the app.
Connect Wallet
- Navigate to Uniswap V3: Enter uniswap-v3.vn in the DApp browser’s address bar.
- Click Connect Wallet: Tap on the “Connect Wallet” button on the Uniswap interface.
- Select Coinbase Wallet: Choose Coinbase Wallet from the list of supported wallets.
- Authorize Connection: Confirm the connection in the Coinbase Wallet app.
- Verify Connection: Your wallet address will appear on the Uniswap interface, indicating that your wallet is successfully connected.
Migrating Liquidity from V2 to V3
Withdrawing Liquidity from Uniswap V2
To migrate your liquidity from Uniswap V2 to V3, you first need to withdraw your liquidity from V2. Here’s how to do it:
Access Your Liquidity Positions
- Visit Uniswap V2 Interface: Go to app.uniswap.org and ensure you are viewing the V2 interface.
- Connect Wallet: Click “Connect Wallet” and select your wallet (e.g., MetaMask) to connect it to the Uniswap interface.
- Navigate to Pool: Click on the “Pool” tab to see your liquidity positions.
Withdraw Liquidity
- Select Position: Identify the V2 liquidity position you wish to migrate. Click on the pool to view details.
- Remove Liquidity: Click “Remove” to start the process of withdrawing your liquidity.
- Adjust Amount: Use the slider to select the amount of liquidity you want to remove (typically, you’ll want to remove 100% if migrating fully).
- Confirm Removal: Click “Approve” and then “Remove” to confirm the transaction in your wallet. You’ll need to approve the transaction and pay a gas fee.
- Receive Tokens: Once the transaction is confirmed, you will receive the underlying tokens (both of the token pair) back in your wallet.
Adding Liquidity to Uniswap V3
After successfully withdrawing your liquidity from Uniswap V2, you can now add it to Uniswap V3. Follow these steps to add liquidity to V3:
Access Uniswap V3 Interface
- Visit Uniswap V3 Interface: Go to https://uniswap-v3.vn and ensure you are on the V3 interface.
- Connect Wallet: Click “Connect Wallet” and select your wallet (e.g., MetaMask) to connect it to the Uniswap interface.
Add Liquidity
- Navigate to Pool: Click on the “Pool” tab and then click “New Position” to add liquidity.
- Select Token Pair: Choose the token pair you want to provide liquidity for, the same as your V2 tokens.
- Select Fee Tier: Uniswap V3 allows you to choose a fee tier (0.05%, 0.30%, or 1%). Select the one that best fits your strategy.
- Set Price Range: Define the price range within which you want to provide liquidity. This is a crucial step in V3 as it determines the efficiency and potential returns of your liquidity.
- Enter Amounts: Input the amount of each token you wish to deposit into the liquidity pool. Ensure you have sufficient balances of both tokens.
- Preview and Approve: Click “Preview” to review your liquidity position details. If everything looks correct, click “Approve” to approve the tokens for transfer.
- Add Liquidity: After approving the tokens, click “Add” and confirm the transaction in your wallet. Pay the necessary gas fees to complete the transaction.
- Receive NFT: In Uniswap V3, your liquidity position is represented as a non-fungible token (NFT). Once the transaction is confirmed, you will receive an NFT representing your position in your wallet.
Setting Up Your Liquidity Position in V3
Selecting Token Pairs and Fee Tiers
When setting up your liquidity position in Uniswap V3, it’s crucial to carefully select your token pairs and fee tiers to optimize your returns. Here’s how to do it:
Selecting Token Pairs
- Choose Token Pair: Select the pair of tokens you want to provide liquidity for. This could be popular pairs like ETH/USDC, ETH/DAI, or any other ERC-20 tokens you hold.
- Consider Market Demand: Choose token pairs that have high trading volumes and demand. This increases the likelihood of earning trading fees.
- Balance and Risks: Assess the balance of your portfolio and the risks associated with each token. Ensure you are comfortable with the volatility and liquidity of the chosen pair.
Selecting Fee Tiers
- Available Fee Tiers: Uniswap V3 offers three fee tiers: 0.05%, 0.30%, and 1%. Each tier represents the fee percentage collected on each trade within that pool.
- Low Fee Tier (0.05%): Suitable for stable pairs with low volatility (e.g., USDC/DAI). This attracts high trading volumes but lower individual fees.
- Medium Fee Tier (0.30%): Ideal for most pairs, especially those with moderate volatility (e.g., ETH/USDC). Balances between trading volume and fee earnings.
- High Fee Tier (1%): Best for exotic or highly volatile pairs (e.g., new or less liquid tokens). Fewer trades but higher fees per trade.
Defining Price Ranges for Liquidity
Uniswap V3 allows liquidity providers to specify price ranges where their liquidity will be active. This feature enhances capital efficiency but requires careful consideration. Here’s how to define your price ranges:
Understanding Price Ranges
- Price Range Concept: Unlike V2, where liquidity is distributed across the entire price curve, V3 allows you to concentrate your liquidity within specific price ranges. This makes your capital more effective but requires market insight.
- Active Liquidity: Your liquidity will only be active and earn fees when the market price of the token pair is within your specified range. If the price moves out of this range, your liquidity becomes inactive until the price re-enters the range.
Setting Price Ranges
- Analyze Market Trends: Use historical price data and market trends to set a price range where you expect the most trading activity. Tools like charts and analytics platforms can help with this.
- Define Upper and Lower Bounds: Specify the upper and lower price bounds for your liquidity. This range should reflect your market outlook and risk tolerance.
- Conservative Approach: For beginners, a wider price range can be safer, ensuring your liquidity remains active through market fluctuations.
- Aggressive Approach: Experienced providers might opt for narrower ranges to maximize capital efficiency and fee earnings, adjusting frequently based on market movements.
Example Scenario
- Token Pair: ETH/USDC
- Fee Tier: 0.30%
- Price Range: If ETH is currently trading at $2,000, you might set a range of $1,800 to $2,200 if you expect ETH to remain within this band in the near term. This means your liquidity will be used for trades only when ETH is between $1,800 and $2,200.
Monitoring and Adjusting
- Regular Monitoring: Keep an eye on market conditions and adjust your price ranges as needed. Active management helps maintain the efficiency of your capital and maximizes fee earnings.
- Rebalancing: If the price consistently moves out of your range, consider rebalancing your liquidity position to align with new market conditions.

Managing Your V3 Liquidity Position
Monitoring Performance and Earnings
Effectively managing your liquidity position on Uniswap V3 involves continuous monitoring and assessment of your performance and earnings. Here’s how to stay on top of your investments:
Using Analytics Tools
- Uniswap Analytics: Use the Uniswap Analytics platform to track the performance of your liquidity pools. This tool provides insights into trading volumes, fee earnings, and overall liquidity.
- Third-Party Tools: Platforms like Zapper, Zerion, and DeBank offer detailed analytics and portfolio tracking for DeFi investments, including Uniswap V3 liquidity positions.
Key Metrics to Monitor
- Trading Volume: Higher trading volumes generally result in higher fee earnings. Monitor the trading activity within your price range to gauge performance.
- Fee Earnings: Regularly check the fees accrued from providing liquidity. This includes both realized fees (collected) and potential fees (uncollected if liquidity is inactive).
- Impermanent Loss: Compare the value of your liquidity position to simply holding the tokens. Impermanent loss occurs when the price ratio of the token pair changes, potentially reducing your earnings.
Periodic Reviews
- Daily/Weekly Checks: Set a routine to review your positions, ideally daily or weekly, to stay updated on market conditions and performance.
- Performance Reports: Generate periodic performance reports to analyze your earnings over time and adjust strategies accordingly.
Adjusting Your Price Range and Positions
Adapting your liquidity positions to market changes is crucial for maintaining optimal performance. Here’s how to adjust your price ranges and positions effectively:
Identifying the Need for Adjustment
- Price Movements: If the market price consistently moves out of your defined range, your liquidity becomes inactive, and you stop earning fees. This indicates a need for adjustment.
- Market Trends: Monitor broader market trends and news that might impact token prices. Being proactive can help you stay ahead of significant price shifts.
Adjusting Price Ranges
- Repositioning Liquidity: To adjust your price range, you’ll need to remove liquidity from the current range and add it to a new range.
- Remove Liquidity: Navigate to the “Pool” tab on Uniswap, select your position, and click “Remove Liquidity.” Confirm the transaction in your wallet.
- Add Liquidity: After removing liquidity, navigate to “New Position” and set the new desired price range. Enter the token amounts and approve the transaction in your wallet.
Strategies for Adjustment
- Narrowing/Widening Ranges: Depending on market conditions, you might want to narrow your range for higher capital efficiency or widen it for increased stability.
- Narrow Range: Higher fee earnings but higher risk if the price moves out of range quickly.
- Wide Range: Lower fee earnings but more stability and less frequent adjustments needed.
- Fee Tier Consideration: Reevaluate the fee tier chosen based on current market volatility and trading volume. Adjusting the fee tier can help optimize your earnings.
Dynamic Rebalancing
- Active Management: In highly volatile markets, more frequent adjustments may be necessary to keep your liquidity within the active price range. Use real-time analytics to make informed decisions.
- Automation Tools: Consider using automation tools or services that offer dynamic rebalancing of liquidity positions based on pre-set parameters.
Example Scenario
- Initial Range: Suppose you initially set a price range of $1,800 to $2,200 for ETH/USDC.
- Market Shift: If ETH moves to $2,300, your liquidity becomes inactive.
- Adjustment: Remove liquidity from the $1,800 to $2,200 range and add it to a new range, say $2,200 to $2,600, to reactivate your position and continue earning fees.
Optimizing Your Experience on Uniswap V3
Tips for Maximizing Returns
To make the most out of your liquidity provision on Uniswap V3, consider the following tips to maximize your returns:
Choose the Right Token Pairs
- High Volume Pairs: Provide liquidity to pairs with high trading volumes. These pairs typically generate more fees.
- Stablecoin Pairs: Consider stablecoin pairs like USDC/DAI, which often have lower volatility and more predictable returns.
Optimize Price Ranges
- Narrow Ranges for Higher Fees: Concentrate your liquidity in narrow price ranges where you expect most trading to occur. This increases capital efficiency and fee earnings.
- Adjust Regularly: Regularly adjust your price ranges based on market conditions to ensure your liquidity remains active and earning fees.
Monitor Market Conditions
- Stay Informed: Keep up-to-date with market news and trends that could impact the price of your token pairs.
- Use Analytics: Leverage tools like Uniswap Analytics and third-party platforms to monitor trading volumes, price movements, and liquidity pool performance.
Manage Gas Costs
- Optimize Transactions: Plan your transactions during periods of low network congestion to minimize gas fees.
- Layer 2 Solutions: Use Layer 2 solutions like Optimism or Arbitrum when available to reduce transaction costs.
Utilizing Advanced Features and Tools
Uniswap V3 offers advanced features and tools that can help you optimize your liquidity provision strategy:
Customizable Fee Tiers
- Choose Appropriate Fees: Select the appropriate fee tier (0.05%, 0.30%, or 1%) based on the volatility and trading volume of your chosen token pair.
- Dynamic Adjustments: Adjust your fee tier dynamically to capitalize on changing market conditions.
Liquidity Position NFTs
- Track Positions: Each liquidity position is represented as an NFT. Use these NFTs to track and manage your positions easily.
- Trade or Transfer Positions: The NFT representation allows for the trading or transferring of liquidity positions, providing additional flexibility.
Advanced Analytics Tools
- Uniswap Analytics: Use the Uniswap Analytics platform to get detailed insights into trading volumes, fees earned, and overall pool performance.
- Third-Party Platforms: Utilize platforms like Zapper, Zerion, and DeBank for comprehensive portfolio tracking and management.
Automation Tools
- Liquidity Management Bots: Consider using liquidity management bots that can automatically adjust your positions based on pre-set parameters and market conditions.
- Automated Rebalancing: Tools that offer automated rebalancing can help maintain optimal price ranges without constant manual intervention.
Risk Management Strategies
- Diversify Liquidity Pools: Spread your liquidity across multiple pools to reduce risk and increase exposure to different trading pairs.
- Monitor Impermanent Loss: Keep an eye on potential impermanent loss and adjust your strategy to mitigate its impact.
Educational Resources
- Stay Educated: Continuously educate yourself on DeFi and liquidity provision strategies through articles, tutorials, and community forums.
- Community Engagement: Participate in Uniswap community discussions on platforms like Discord and Reddit to share insights and learn from other liquidity providers.