
To use Uniswap v2 instead of v3, visit the Uniswap website and select the “Use Uniswap v2” link. Connect your wallet, and navigate to the “Swap” or “Pool” tab to trade or provide liquidity. Uniswap v2 offers a simpler interface with a single fee tier and uniform liquidity distribution, making it a straightforward option for users familiar with the previous version.
Accessing Uniswap v2
Navigating to the Uniswap v2 Interface
To use Uniswap v2, you need to access the specific interface designed for the previous version of the protocol. Here are the steps to navigate to Uniswap v2:
- Visit the Official Uniswap Website: Go to the official Uniswap website at uniswap.org using a secure web browser.
- Select the Uniswap v2 Interface: On the Uniswap homepage, scroll down to find the “Use Uniswap v2” link or button. This option is typically provided to ensure users can still access the older version.
- Bookmark the Uniswap v2 URL: For easy future access, bookmark the Uniswap v2 interface URL in your web browser. This helps you avoid navigating through the main site each time.
By following these steps, you can ensure that you are using the correct version of the Uniswap interface for your trading and liquidity needs.
Connecting Your Wallet to Uniswap v2
Once you have accessed the Uniswap v2 interface, the next step is to connect your wallet. Here’s how to do it:
- Choose a Compatible Wallet: Uniswap v2 supports various Ethereum wallets, including MetaMask, Trust Wallet, Coinbase Wallet, and others. Ensure you have a compatible wallet installed and set up.
- Connect Your Wallet:
- Open the Uniswap v2 interface and click on the “Connect Wallet” button located at the top right corner of the page.
- Select your preferred wallet from the list of supported options. For instance, if you are using MetaMask, click on the MetaMask option.
- Follow the prompts to authorize the connection. You may need to open your wallet app and approve the connection request.
- Verify the Connection: Once connected, you should see your wallet address displayed in the top right corner of the Uniswap interface. This indicates that your wallet is successfully linked to Uniswap v2.

Adding Liquidity on Uniswap v2
Selecting Liquidity Pools
When adding liquidity to Uniswap v2, the first step is to select the appropriate liquidity pool. Here’s how to choose the right pool for your needs:
- Identify Trading Pairs: Determine which trading pairs you want to provide liquidity for. Common pairs include ETH/DAI, ETH/USDC, and other ERC-20 token pairs.
- Check Pool Information: Review the details of the liquidity pool, including current liquidity, trading volume, and historical data. This information can help you assess the potential returns and risks.
- Consider Market Demand: Choose pools with higher trading activity to maximize fee earnings. Pools with higher volume typically generate more transaction fees for liquidity providers.
- Assess Your Assets: Ensure you have equal values of both tokens in the pair you want to add liquidity to. For example, to add liquidity to the ETH/DAI pool, you need both ETH and DAI in your wallet.
Providing Liquidity Steps
Once you have selected a liquidity pool, follow these steps to provide liquidity on Uniswap v2:
- Navigate to the Pool Section: In the Uniswap v2 interface, click on the “Pool” tab to access the liquidity provision options.
- Add Liquidity: Click on the “Add Liquidity” button. This will open a new window where you can specify the details of your liquidity provision.
- Select Token Pair: Choose the tokens you want to provide liquidity for from the drop-down menus. Ensure you have equal values of both tokens in your wallet.
- Enter Amounts: Enter the amount of each token you wish to add to the liquidity pool. The interface will automatically calculate the corresponding amount of the other token based on the current pool ratio.
- Approve Tokens: If this is your first time adding liquidity for these tokens, you will need to approve the Uniswap contract to spend your tokens. Click on the “Approve” button for each token and confirm the transaction in your wallet.
- Supply Liquidity: After approving the tokens, click on the “Supply” button. Review the details of the transaction, including the amount of pool tokens you will receive and the expected fees.
- Confirm Transaction: Confirm the transaction in your wallet. This will submit the transaction to the Ethereum network. Wait for the transaction to be confirmed.
- Receive Pool Tokens: Once the transaction is confirmed, you will receive pool tokens representing your share in the liquidity pool. These tokens can be used to withdraw your liquidity at any time.
Trading on Uniswap v2
Finding Trading Pairs
When trading on Uniswap v2, the first step is to find the trading pairs you are interested in. Here’s how to locate and select the appropriate trading pairs:
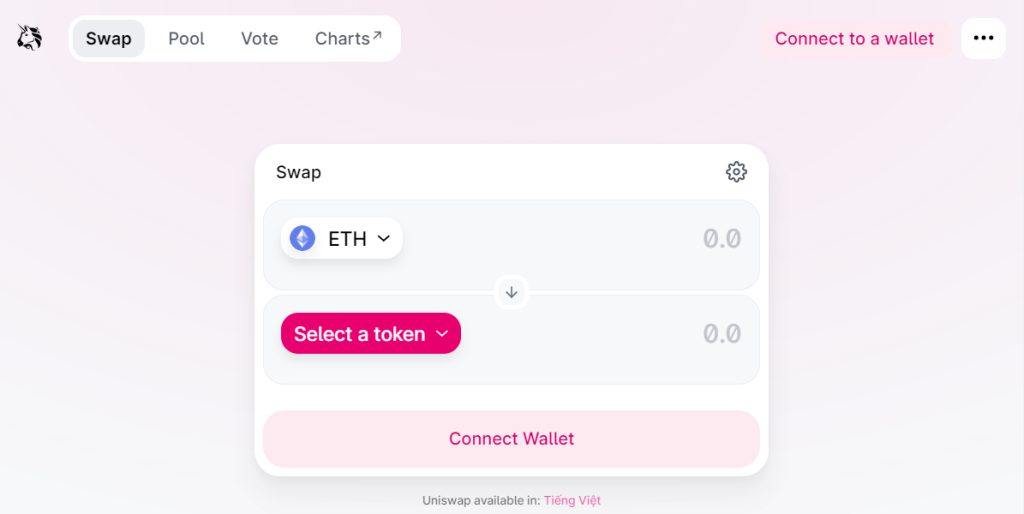
- Access the Swap Interface: Navigate to the Uniswap v2 interface and click on the “Swap” tab to access the trading section.
- Search for Tokens: Use the search bar to find the tokens you wish to trade. You can search by token name, symbol, or contract address.
- Review Available Pairs: Uniswap v2 lists all available trading pairs for the selected tokens. Review the list to find the pair that matches your trading needs.
- Check Liquidity and Volume: Before proceeding with a trade, check the liquidity and trading volume of the selected pair. Higher liquidity ensures better price stability and lower slippage during trades.
Executing Trades
Once you have identified the right trading pair, follow these steps to execute your trade on Uniswap v2:
- Connect Your Wallet: Ensure your wallet is connected to the Uniswap v2 interface. Click on the “Connect Wallet” button and select your preferred wallet.
- Select Tokens to Trade: In the Swap interface, choose the token you want to swap from the dropdown menu in the “From” field. Then, select the token you want to receive in the “To” field.
- Enter Trade Amount: Enter the amount of the token you wish to swap. The interface will automatically calculate the equivalent amount of the receiving token based on the current exchange rate.
- Review Exchange Rate and Fees: Carefully review the exchange rate and the estimated gas fees for the transaction. Uniswap v2 will provide details on the expected slippage and minimum received tokens.
- Approve Token Spending: If you are swapping a token for the first time, you will need to approve the Uniswap contract to spend your tokens. Click the “Approve” button and confirm the transaction in your wallet.
- Execute the Swap: Once the token spending is approved, click the “Swap” button to execute the trade. Review the transaction details and confirm the swap in your wallet.
- Transaction Confirmation: Wait for the transaction to be confirmed on the Ethereum network. You can monitor the status through your wallet or a blockchain explorer.
- Receive Tokens: After confirmation, the swapped tokens will be credited to your wallet. You can check your wallet balance to verify the receipt of tokens.
Managing Liquidity Positions
Monitoring Your Liquidity
Effectively managing your liquidity positions on Uniswap v2 requires regular monitoring to ensure you are optimizing your returns and managing risks appropriately. Here’s how to keep track of your liquidity:
- Access the Pool Dashboard: Navigate to the “Pool” tab on the Uniswap v2 interface to access your liquidity dashboard. This section provides an overview of all your active liquidity positions.
- View Pool Statistics: Check the details of each liquidity pool, including your share of the pool, the current value of your liquidity, and the fees earned. This information helps you understand how your positions are performing.
- Track Earnings: Monitor the fees you have earned from providing liquidity. Uniswap v2 allows you to see accumulated fees, which can be a significant part of your returns.
- Monitor Market Conditions: Keep an eye on the broader market conditions and the specific trading pair’s performance. Price volatility and trading volume can impact your liquidity’s value and earnings.
- Use Analytics Tools: Leverage external analytics tools and platforms that provide deeper insights into your liquidity positions. Tools like Zapper.fi or DeFi Pulse can offer additional data and trends.
Removing Liquidity
When you decide to remove your liquidity from a pool, follow these steps to ensure a smooth and efficient process:
- Navigate to the Pool Dashboard: In the Uniswap v2 interface, go to the “Pool” tab where your active liquidity positions are displayed.
- Select the Liquidity Pool: Choose the pool from which you want to remove liquidity. Click on the pool to view its details.
- Click on “Remove”: In the pool details section, click the “Remove” button to initiate the process of withdrawing your liquidity.
- Specify the Amount: Specify the percentage or amount of liquidity you wish to remove. You can choose to remove all or part of your liquidity from the pool.
- Review Removal Details: Review the details of the liquidity removal, including the estimated amounts of tokens you will receive and the transaction fees.
- Approve the Transaction: Confirm the removal of liquidity in your wallet. This step involves approving the Uniswap contract to transfer your tokens back to your wallet.
- Execute the Transaction: After approval, execute the transaction by clicking the “Remove” button. Wait for the transaction to be processed and confirmed on the Ethereum network.
- Receive Tokens: Once the transaction is confirmed, the tokens (both of the pair) will be credited to your wallet. Check your wallet balance to ensure the tokens have been received.
Understanding Uniswap v2 Fees
Fee Structure in Uniswap v2
Uniswap v2 employs a straightforward fee structure that is essential for both traders and liquidity providers to understand. Here are the key components:
- Trading Fees: Every trade on Uniswap v2 incurs a fixed fee of 0.30%. This fee is automatically deducted from each transaction and is distributed to the liquidity providers (LPs) of the pool.
- Liquidity Provider Fees: The 0.30% trading fee collected from each trade is accumulated and distributed to LPs based on their share of the liquidity pool. This serves as the primary incentive for LPs to provide liquidity.
- Gas Fees: In addition to the trading fee, users must also pay gas fees for transactions on the Ethereum network. Gas fees cover the computational cost of executing transactions and vary based on network congestion and transaction complexity.
Calculating Transaction Costs
Calculating transaction costs on Uniswap v2 involves understanding both the trading fees and gas fees. Here’s how you can estimate these costs:
- Trading Fee Calculation:
- Determine Trade Amount: Identify the total value of the trade you are planning to execute.
- Apply Trading Fee: Multiply the trade amount by 0.30% (or 0.003) to calculate the trading fee.
- Example: For a trade of 1 ETH worth $2,000, the trading fee would be $2,000 * 0.003 = $6.
- Gas Fee Calculation:
- Check Current Gas Prices: Use tools like EthGasStation or Etherscan to check the current gas prices. Gas prices are usually measured in Gwei.
- Estimate Gas Usage: Each type of transaction (e.g., swapping tokens, adding/removing liquidity) requires a different amount of gas. For example, a simple token swap might require around 100,000 gas units.
- Calculate Gas Cost: Multiply the gas price (in Gwei) by the gas usage to get the total gas cost. Convert Gwei to ETH (1 Gwei = 0.000000001 ETH) and then to USD based on the current ETH price.
- Example: If the gas price is 50 Gwei, and the transaction requires 100,000 gas units, the gas cost in ETH would be 50 * 100,000 * 0.000000001 = 0.005 ETH. If 1 ETH = $2,000, the gas cost in USD would be 0.005 * $2,000 = $10.

Security Measures on Uniswap v2
Ensuring Safe Transactions
Ensuring safe transactions on Uniswap v2 involves following best practices to protect your funds and personal information. Here are key measures to take:
- Use Reputable Wallets: Always use well-known and reputable Ethereum wallets like MetaMask, Trust Wallet, or Ledger. These wallets are designed with robust security features to protect your funds.
- Verify URLs: Ensure you are accessing Uniswap through the official website (uniswap.org). Be cautious of phishing sites that mimic the Uniswap interface. Bookmark the official site to avoid accidental clicks on fraudulent links.
- Enable Security Features: Utilize security features provided by your wallet, such as two-factor authentication (2FA) and biometric verification (fingerprint or facial recognition) where available.
- Monitor Transaction Details: Before confirming any transaction, double-check the details, including token amounts and recipient addresses. Make sure you are interacting with the correct smart contracts.
- Stay Updated: Keep your wallet and any associated software up to date. Updates often include important security patches and improvements.
- Beware of Phishing Attempts: Be cautious of unsolicited messages or emails asking for your private keys or seed phrases. Uniswap and other legitimate services will never ask for this information.
Protecting Your Private Keys
Protecting your private keys is crucial for securing your cryptocurrency assets. Here are some best practices:
- Never Share Your Private Keys: Your private keys are the key to accessing your funds. Never share them with anyone or enter them on unknown websites.
- Use Hardware Wallets: Hardware wallets like Ledger and Trezor store your private keys offline, providing an additional layer of security against online threats.
- Create Strong Passwords: Use strong, unique passwords for your wallets and any related accounts. Consider using a password manager to generate and store complex passwords securely.
- Backup Your Seed Phrase: When setting up your wallet, you will be given a seed phrase. Write this phrase down and store it in a secure, offline location. Do not store it digitally where it could be accessed by hackers.
- Enable Multi-Signature Authentication: If your wallet supports multi-signature authentication, enable it. This feature requires multiple approvals for transactions, adding an extra layer of security.
- Secure Your Devices: Ensure that the devices you use to access your wallets are secure. This includes installing antivirus software, enabling firewalls, and avoiding the use of public Wi-Fi for transactions.
- Regular Security Audits: Periodically review your security settings and practices. Ensure that there are no vulnerabilities or outdated security measures that could compromise your private keys.
Comparing Uniswap v2 and v3
Key Differences Between v2 and v3
Uniswap v2 and v3 are both decentralized exchange (DEX) protocols, but v3 introduces several advancements and changes aimed at improving efficiency, flexibility, and user experience. Here are the key differences:
- Concentrated Liquidity:
- Uniswap v2: Liquidity is spread uniformly across the entire price curve between 0 and infinity, making capital less efficient.
- Uniswap v3: Liquidity providers (LPs) can concentrate their liquidity within specific price ranges, increasing capital efficiency and potential returns.
- Multiple Fee Tiers:
- Uniswap v2: Has a single fee tier of 0.30% for all trading pairs.
- Uniswap v3: Introduces multiple fee tiers (0.05%, 0.30%, and 1.00%) allowing LPs to choose based on their risk and return preferences.
- Improved Price Oracles:
- Uniswap v2: Uses simple moving averages for price oracles, which can be susceptible to manipulation.
- Uniswap v3: Implements time-weighted average prices (TWAPs) for more secure and accurate price feeds, reducing the risk of manipulation.
- Range Orders:
- Uniswap v2: Does not support custom range orders.
- Uniswap v3: Allows LPs to create liquidity positions that mimic limit orders within specified price ranges, providing greater control and flexibility.
- Enhanced Capital Efficiency:
- Uniswap v2: Requires more capital to achieve the same level of market depth.
- Uniswap v3: Achieves higher capital efficiency, enabling LPs to provide the same liquidity with less capital.
- NFT-based Liquidity Positions:
- Uniswap v2: Uses ERC-20 tokens to represent liquidity positions.
- Uniswap v3: Uses non-fungible tokens (NFTs) to represent custom liquidity positions, allowing for more personalized and flexible management.
Pros and Cons of Using Uniswap v2
While Uniswap v3 offers numerous improvements, there are still reasons why some users might prefer Uniswap v2. Here are the pros and cons:
Pros of Using Uniswap v2:
- Simplicity: Uniswap v2’s uniform liquidity model is simpler and easier to understand for new users and LPs.
- Single Fee Structure: The single fee tier of 0.30% simplifies fee calculations and decision-making.
- Wider Adoption: Uniswap v2 has been in use longer, meaning it has widespread adoption and a larger number of liquidity pools.
- Established Ecosystem: Many DeFi projects and integrations were initially built around Uniswap v2, making it a well-established component of the DeFi landscape.
Cons of Using Uniswap v2:
- Lower Capital Efficiency: Liquidity is less efficient, requiring more capital to achieve the same market depth compared to v3.
- Fixed Fee Tier: The single fee tier limits flexibility for LPs who might prefer different fee structures based on risk and return.
- No Concentrated Liquidity: LPs cannot concentrate their liquidity in specific price ranges, potentially reducing returns.
- Less Accurate Price Oracles: The price oracle mechanism is more susceptible to manipulation compared to the improved oracles in v3.
- Lack of Range Orders: Uniswap v2 does not support custom range orders, limiting strategic options for LPs.