
To use Uniswap v3 with MetaMask, first install the MetaMask extension and set up your wallet. Then, visit the Uniswap website, connect your MetaMask wallet, and transfer or buy cryptocurrency in MetaMask. Finally, select a trading pair on Uniswap, initiate the swap, and confirm the transaction in MetaMask.
Setting Up MetaMask for Uniswap v3
Downloading and Installing MetaMask
To get started with MetaMask, you’ll first need to download and install the MetaMask extension for your web browser. MetaMask is available for Chrome, Firefox, Brave, and Edge browsers. Here’s how you can do it:
- Visit the official MetaMask website.
- Click on the “Download” button.
- Choose your browser and follow the prompts to add the MetaMask extension.
- Once installed, you will see the MetaMask icon in your browser’s toolbar.
Creating a New MetaMask Wallet
After installing MetaMask, the next step is to create a new wallet. This wallet will store your cryptocurrencies and allow you to interact with decentralized applications like Uniswap v3. Follow these steps:
- Click on the MetaMask icon in your browser toolbar to open the extension.
- Click on “Get Started” and then select “Create a Wallet.”
- Create a strong password for your wallet. Ensure it’s unique and secure.
- Backup your Secret Recovery Phrase. This phrase is crucial for recovering your wallet if you forget your password or lose access to your device. Write it down and store it in a secure place.
Securing Your MetaMask Wallet
Security is paramount when it comes to managing your cryptocurrencies. Here are some best practices to secure your MetaMask wallet:
- Backup Your Secret Recovery Phrase: As mentioned, this is crucial for wallet recovery. Never share this phrase with anyone.
- Enable Two-Factor Authentication: While MetaMask itself doesn’t support 2FA, you can add an extra layer of security to your email and any other accounts associated with your crypto activities.
- Beware of Phishing Sites: Always ensure you are interacting with the correct Uniswap website. Bookmark the official Uniswap site and avoid clicking on suspicious links.
- Regularly Update MetaMask: Keep your MetaMask extension updated to benefit from the latest security features and bug fixes.
- Use a Hardware Wallet: For added security, consider connecting MetaMask to a hardware wallet like Ledger or Trezor. This way, your private keys are stored offline, reducing the risk of online hacks.
Connecting MetaMask to Uniswap v3
Accessing Uniswap v3
To start using Uniswap v3 with MetaMask, you’ll need to access the Uniswap interface. Here’s how:
- Open your web browser and go to the official Uniswap website.
- Navigate to the “Launch App” button and click on it to open the Uniswap interface.
- Ensure you are on the official site to avoid phishing attempts.
Authorizing MetaMask Connection
Once you have accessed the Uniswap v3 interface, you need to connect your MetaMask wallet. Follow these steps:
- Click on the “Connect Wallet” button usually located in the upper right corner of the Uniswap interface.
- A pop-up will appear asking you to select your wallet provider. Choose MetaMask.
- MetaMask will open a new window prompting you to connect. Select the account you wish to connect to Uniswap and click “Next.”
- Review the permissions Uniswap is requesting and click “Connect” to authorize the connection.
- Your MetaMask wallet is now connected to Uniswap v3, and you can start trading tokens and providing liquidity.
Adding Funds to Your MetaMask Wallet
Transferring Crypto to MetaMask
To use Uniswap v3, you’ll need to have some cryptocurrency in your MetaMask wallet. Here’s how you can transfer crypto to MetaMask:
- Get Your MetaMask Wallet Address: Open MetaMask and click on your account name to copy your wallet address.
- Transfer Funds from an Exchange: If you have crypto on an exchange like Coinbase or Binance, go to your exchange account, select the cryptocurrency you want to transfer, and initiate a withdrawal. Paste your MetaMask wallet address as the destination.
- Confirm the Transfer: Follow the exchange’s instructions to complete the transfer. Depending on the cryptocurrency and network congestion, it may take a few minutes to a few hours for the funds to appear in your MetaMask wallet.
Buying Crypto Directly on MetaMask
If you don’t have cryptocurrency to transfer or prefer to buy it directly, MetaMask allows you to purchase crypto within the wallet. Here’s how:
- Open MetaMask and Click “Buy”: In the MetaMask interface, click on the “Buy” button.
- Select a Payment Method: MetaMask offers various payment methods, including bank transfers and credit card purchases through integrated partners like Wyre or Transak.
- Follow the On-Screen Instructions: Choose the cryptocurrency you want to buy and enter the amount. Follow the prompts to complete the purchase, which typically involves entering payment details and confirming the transaction.
- Wait for Confirmation: After completing the purchase, the cryptocurrency will be deposited into your MetaMask wallet. This process usually takes a few minutes, but times can vary based on the payment method and provider.
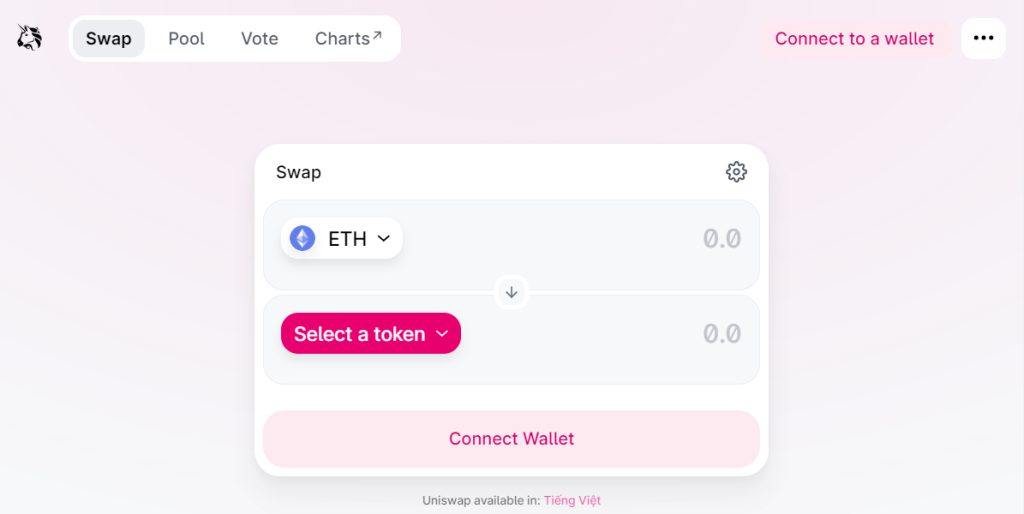
Selecting a Trading Pair on Uniswap v3
Navigating to the Swap Interface
To start trading on Uniswap v3, you need to access the swap interface. Here’s how to do it:
- Open Uniswap App: Visit the Uniswap website and click on “Launch App” to open the Uniswap interface.
- Connect Your Wallet: Ensure your MetaMask wallet is connected to Uniswap. If not, follow the steps to authorize the connection.
- Navigate to the Swap Tab: Once connected, you will be on the main Uniswap interface. Click on the “Swap” tab if you are not already there.
Choosing Tokens to Trade
Selecting the right trading pair is essential for your transaction. Here’s how to choose tokens to trade:
- Select the First Token: In the swap interface, you will see two dropdown menus. The first one is for the token you want to trade from. Click on it to open a list of available tokens.
- Search and Select: Type the name or symbol of the token you wish to trade from (e.g., ETH, USDC). Click on the token to select it.
- Select the Second Token: The second dropdown menu is for the token you want to receive. Click on it to open the list of tokens.
- Search and Select: Type the name or symbol of the token you wish to trade to and click on it to select.
- Verify Token Details: Ensure you have selected the correct tokens and double-check their symbols to avoid any mistakes.
Swapping Tokens on Uniswap v3 Using MetaMask
Initiating a Token Swap
Once you have selected the tokens you want to trade, you can initiate the token swap. Here’s how:
- Enter the Amount: In the swap interface, enter the amount of the first token you wish to trade. The system will automatically calculate and display the estimated amount of the second token you will receive.
- Review the Details: Check the details of the trade, including the exchange rate, slippage tolerance, and any fees. Make sure everything looks correct.
- Click “Swap”: Once you are satisfied with the details, click the “Swap” button to proceed.
- Confirm the Swap: A confirmation window will appear, summarizing the trade details. Review the information carefully.
- Click “Confirm Swap”: If everything looks correct, click “Confirm Swap” to initiate the transaction.
Confirming the Transaction in MetaMask
After initiating the swap on Uniswap, you need to confirm the transaction in MetaMask. Follow these steps:
- MetaMask Pop-Up: A MetaMask pop-up window will appear, showing the transaction details, including gas fees and total cost.
- Review Gas Fees: Check the gas fees and make adjustments if necessary. You can choose between different gas fee options (e.g., slow, average, fast) based on how quickly you want the transaction to be processed.
- Click “Confirm”: Once you have reviewed all the details and are satisfied, click the “Confirm” button in MetaMask.
- Transaction Processing: The transaction will be submitted to the Ethereum network. You can track its progress in MetaMask under the “Activity” tab.
- Transaction Confirmation: Once the transaction is confirmed on the blockchain, the swapped tokens will appear in your MetaMask wallet.

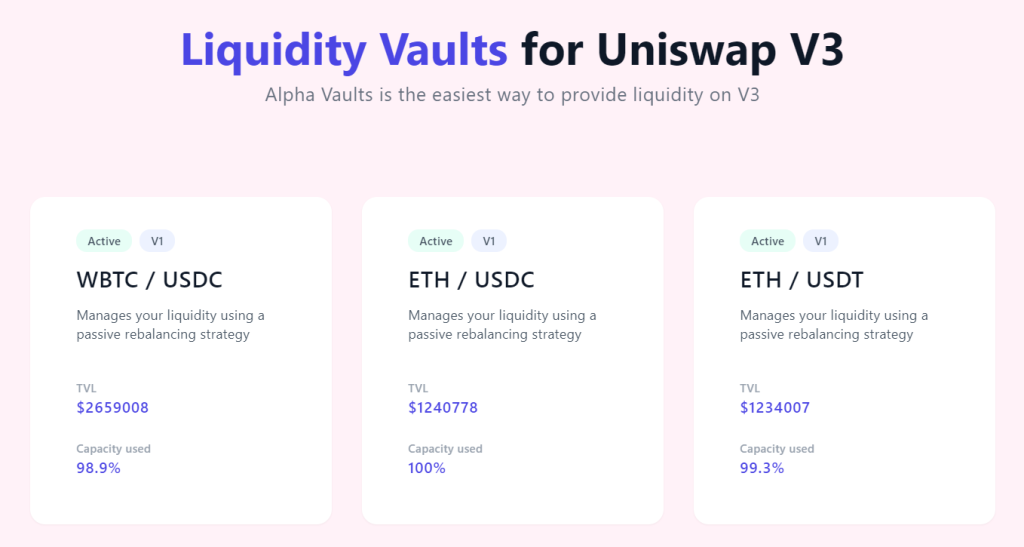
Managing Liquidity on Uniswap v3
Providing Liquidity to Pools
Adding liquidity to Uniswap v3 pools allows you to earn a portion of the trading fees. Here’s how to provide liquidity:
- Access the Pool Interface: Go to the Uniswap interface and click on the “Pool” tab.
- Click “Add Liquidity”: Select the option to add liquidity. You will be prompted to select the tokens and the amount you want to contribute to the pool.
- Select Tokens and Amount: Choose the token pair for which you want to provide liquidity. Enter the amount of each token you wish to add. Uniswap will display the ratio and amount required for the other token.
- Set Price Range: Uniswap v3 allows you to specify the price range within which you are willing to provide liquidity. Set the minimum and maximum prices.
- Review and Approve: Check the details, including the fee tier and your position’s expected earnings. Approve each token for the Uniswap smart contract if this is your first time providing liquidity for these tokens.
- Add Liquidity: Click “Add Liquidity” and confirm the transaction in MetaMask. Once the transaction is confirmed, your liquidity position will be active.
Removing Liquidity from Pools
If you wish to withdraw your funds and stop providing liquidity, you can remove your liquidity from the pool. Here’s how:
- Access the Pool Interface: Go to the Uniswap interface and click on the “Pool” tab.
- Select Your Position: You will see your existing liquidity positions. Select the position you want to remove liquidity from.
- Click “Remove Liquidity”: Choose the amount of liquidity you wish to remove. You can remove all or part of your position.
- Set Amounts: Uniswap will display the estimated amounts of each token you will receive upon withdrawal. Adjust the amounts if needed.
- Approve the Transaction: Confirm the removal by approving the transaction in MetaMask. This might require two transactions: one to approve and another to execute.
- Confirm Removal: Once the transaction is confirmed on the blockchain, your tokens will be returned to your MetaMask wallet, and your liquidity position will be closed or adjusted accordingly.
Troubleshooting Common Issues with MetaMask and Uniswap v3
Resolving Connection Problems
Connection issues between MetaMask and Uniswap can disrupt your trading and liquidity activities. Here are steps to resolve common connection problems:
- Refresh the Browser: Sometimes, simply refreshing the browser can re-establish the connection between MetaMask and Uniswap.
- Reconnect Wallet: Click on the “Disconnect” button in Uniswap and then “Connect Wallet” to re-establish the connection with MetaMask.
- Check Network Settings: Ensure MetaMask is set to the correct network (Ethereum Mainnet). Sometimes, switching networks and then switching back can resolve the issue.
- Update MetaMask and Browser: Make sure both your MetaMask extension and web browser are up-to-date. Updates often include bug fixes and improvements.
- Clear Browser Cache: Clearing your browser’s cache and cookies can resolve connection issues. Be sure to back up any important data before doing so.
- Disable Browser Extensions: Other browser extensions might conflict with MetaMask. Try disabling all other extensions and see if the issue persists.
Addressing Failed Transactions
Failed transactions can be frustrating and costly. Here are some tips to address and prevent them:
- Check Gas Fees: One common reason for failed transactions is insufficient gas fees. Ensure you are setting an appropriate gas fee for the current network conditions.
- Increase Gas Limit: Sometimes, the default gas limit may not be sufficient for certain transactions. Try increasing the gas limit manually in MetaMask.
- Verify Token Approvals: Ensure you have properly approved the token you are trying to trade or add liquidity with. This is a separate transaction that needs to be confirmed before the actual trade.
- Check for Network Congestion: Ethereum network congestion can cause delays and failures. If the network is heavily congested, consider waiting for a less busy time to execute your transaction.
- Review Contract Addresses: Ensure you are interacting with the correct contract addresses. Incorrect addresses can cause transactions to fail or lead to loss of funds.
- Re-submit the Transaction: If a transaction fails, try resubmitting it with a higher gas fee. You can also cancel the pending transaction from MetaMask and start a new one.